Dr. Neil's Notes
Software > Coding
.NET Web Server on Raspberry Pi
Introduction
In previous Notes I have documented how to get a Raspberry Pi setup to develop with .NET, a few simple console programs that Animate ASCII art, display a clock, and display the weather. Most recently how to use the camera on a Raspberry Pi from simple .NET code.
In this Note I explain how to use .NET to create a simple web server on a Raspberry Pi.
The objective is to display a video on a web site hosted by the Raspberry Pi.
The code shown in this Note will work on any platform supported by .NET 6 (Windows, Mac, Linux).
If you want to get a Raspberry Pi setup to run .NET code, follow the instructions in the .NET Development on a Raspberry Pi document.
This document assumes you have installed .NET 6 and Visual Studio Code.
This code will run on a Mac, Windows, Linux, and has been tested on a Raspberry Pi.
Create a new project
If there is not already a folder for code projects, create a folder for code projects. I created a folder called dev.
Open a Terminal session and navigate to the folder where you want to create the new folder (eg Documents) and enter
mkdir dev
This makes the directory dev
Navigate to that directory
cd dev
then open Visual Studio Code. Note the 'dot' after the code, this tells Visual Studio Code to open the current folder.
code .
The terminal entries should look something like this:
~ $ cd Documents/
~/Documents $ mkdir dev
~/Documents $ cd dev/
~/Documents/dev $ code .
~/Documents/dev $
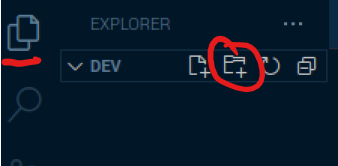
In Visual Studio Code create a new folder in the code (dev) folder, call it dotnetPiServer
Make sure you have the Explorer open (Ctrl+Shift+E), then click the New Folder icon, and name the new folder dotnetPiServer
Open the Terminal window in Visual Studio Code, you can use the menu to select Terminal - New Terminal or press Ctrl+Shift+`
The Terminal will open along the bottom of the Visual Studio Code window, and it will open in the folder you have opened with Visual Studio Code. In this case it will be the dev folder.
Change the directory to the new folder just created.
cd dotnetPiServer/
To create the .NET 6 web application use the command
dotnet new web
The default name of the new project is the name of the folder in which the project is being created.
The output should look like this.
~/Documents/dev $ cd dotnetPiServer/
~/Documents/dev/dotnetPiServer $ dotnet new web
The template "ASP.NET Core Empty" was created successfully.

Processing post-creation actions...
Running 'dotnet restore' on /home/pi/Documents/dev/dotnetPiServer/dotnetPiServer.csproj...
  Determining projects to restore...
  Restored /home/pi/Documents/dev/dotnetPiServer/dotnetPiServer.csproj (in 600 ms).
Restore succeeded.
Also notice that the files created are now shown in the Explorer view of Visual Studio Code
Run the new application from the Terminal window in Visual Studio Code with
dotnet run
This dotnet run command will compile the project code in the current folder and run it.
:~/Documents/dev/dotnetPiServer $ dotnet run
Building...
info: Microsoft.Hosting.Lifetime[14]
      Now listening on: https://localhost:7020
info: Microsoft.Hosting.Lifetime[14]
      Now listening on: http://localhost:5095
info: Microsoft.Hosting.Lifetime[0]
      Application started. Press Ctrl+C to shut down.
info: Microsoft.Hosting.Lifetime[0]
      Hosting environment: Development
info: Microsoft.Hosting.Lifetime[0]
      Content root path: /home/pi/Documents/dev/dotnetPiServer/
It does not do much yet, other than output Hello, World! on a web page.
Open a browser on your local device, (in my case a Raspberry Pi with Chromium)
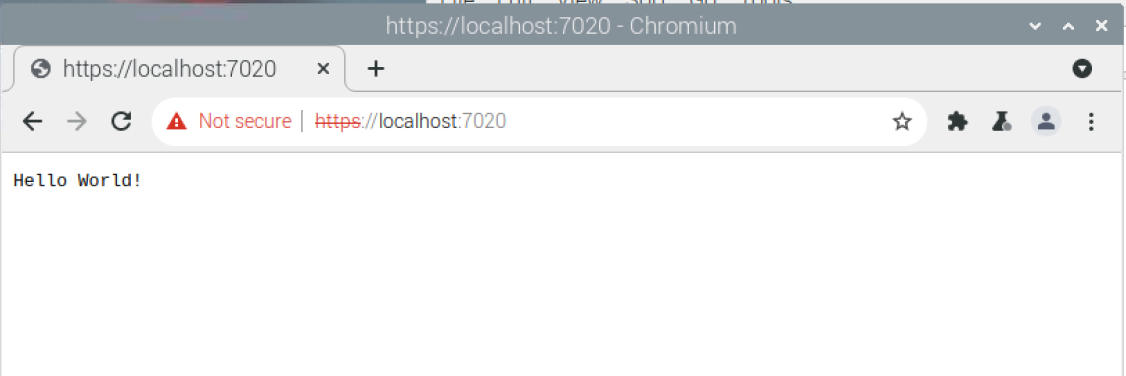
This is fine for localhost (the Raspberry Pi), however you need to be able to see the site from other machines on your network.
Access web page from another machine
Return to the Terminal window in Visual Studio code where the dotnet run command was entered.
Press ctrl+c to stop running the web app.
In the Terminal (SSH or Terminal on the Raspberry Pi) use the hostname command to to get the IP address of your local machine.
hostname -I
The address required is the string of digits and dots that look something like this 195.188.10.105
In the Terminal dotnet run with a url, replacing 195.188.10.105 with the IP address of your device.
dotnet run --urls=http://195.188.10.105:8080/
The Terminal window should then display the details of the running web server on the correct IP addesss, and on port 8080
:~/Documents/dev/dotnetPiServer $ dotnet run --urls=http://195.188.10.105:8080/
Building...
info: Microsoft.Hosting.Lifetime[14]
      Now listening on: http://195.188.10.105:8080
info: Microsoft.Hosting.Lifetime[0]
      Application started. Press Ctrl+C to shut down.
info: Microsoft.Hosting.Lifetime[0]
      Hosting environment: Development
info: Microsoft.Hosting.Lifetime[0]
      Content root path: /home/pi/Documents/dev/dotnetPiServer/
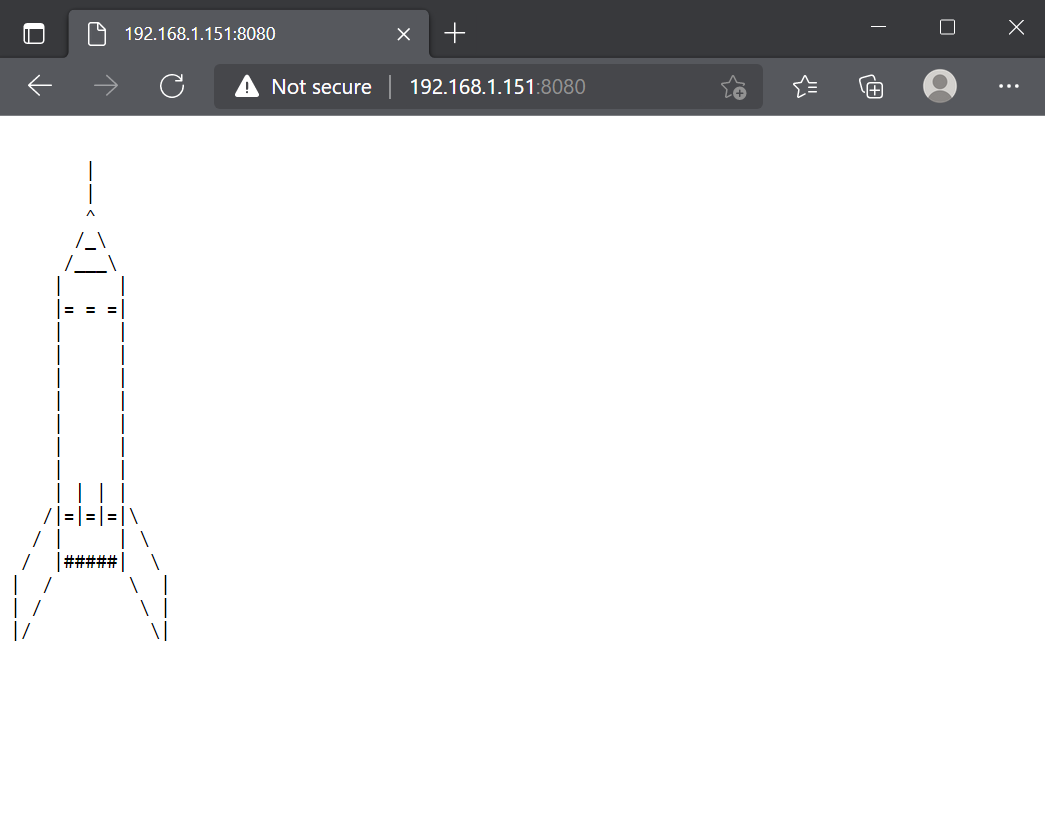
From another computer on the network, or even a phone or tablet, open a web browser and in the address enter the IP address of the Raspberry Pi with the port as listed in the Terminal on the Raspberry Pi.
For example
http://195.188.10.105:8080/
The browser should display the same page seen before, now from a different machine.
Congratulations you have built a simple web server.
Press ctrl+c to stop running the web app.
Change the content being displayed
In Visual Studio Code, open the Program.cs file in the dotnetPiServer folder (created in the previous steps)
It should look like this.
var builder = WebApplication.CreateBuilder(args);
var app = builder.Build();

app.MapGet("/", () => "Hello World!");
app.Run();
If you followed the .NET Console Animations notes you might deduce that you could change the Program.cs file as shown below to display some ASCII art on a web page.
var builder = WebApplication.CreateBuilder(args);
var app = builder.Build();

app.MapGet("/", () => GetPageContent());
app.Run();

string GetPageContent()
{
    System.Text.StringBuilder contentBuilder = new();
    contentBuilder.AppendLine(@"                ");
    contentBuilder.AppendLine(@"       |        ");
    contentBuilder.AppendLine(@"       |        ");
    contentBuilder.AppendLine(@"       ^        ");
    contentBuilder.AppendLine(@"      /_\       ");
    contentBuilder.AppendLine(@"     /___\      ");
    contentBuilder.AppendLine(@"    |     |     ");
    contentBuilder.AppendLine(@"    |= = =|     ");
    contentBuilder.AppendLine(@"    |     |     ");
    contentBuilder.AppendLine(@"    |     |     ");
    contentBuilder.AppendLine(@"    |     |     ");
    contentBuilder.AppendLine(@"    |     |     ");
    contentBuilder.AppendLine(@"    |     |     ");
    contentBuilder.AppendLine(@"    |     |     ");
    contentBuilder.AppendLine(@"    |     |     ");
    contentBuilder.AppendLine(@"    | | | |     ");
    contentBuilder.AppendLine(@"   /|=|=|=|\    ");
    contentBuilder.AppendLine(@"  / |     | \   ");
    contentBuilder.AppendLine(@" /  |#####|  \  ");
    contentBuilder.AppendLine(@"|  /       \  | ");
    contentBuilder.AppendLine(@"| /         \ | ");
    contentBuilder.AppendLine(@"|/           \| ");
    return contentBuilder.ToString();
}
In the Terminal window run the program (remember to replace IP_ADDRESS with the IP address of the Raspberry Pi)
dotnet run --urls=http://IP_ADDRESS:8080/
Test the web site by opening a browser on another machine and entering the URL address into the address bar.
Back in the Raspberry Pi Terminal press ctrl+c to stop running the web app.
Display an HTML page
In this Note the goal is to display a video, to achieve this an HTML page will be created that can render HTML output from the Raspberry Pi web server.
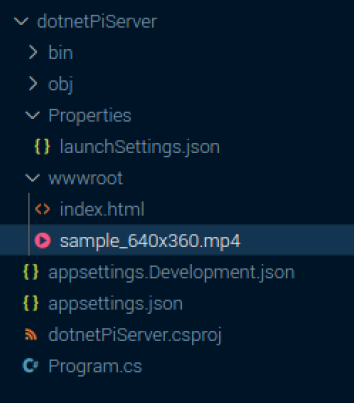
Create a folder in the project folder named wwwroot, and in this folder create a file named index.html
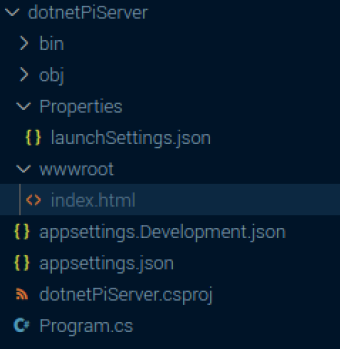
In Visual Studio Code open the index.html page and edit it to contain the following
<!doctype html>
<html>
<head>
<title>Pi Server Home</title>
</head>
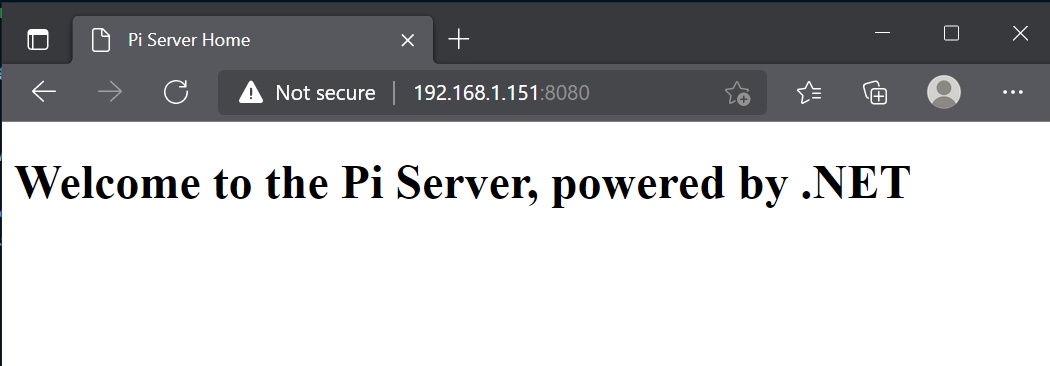
<body>
<h1>Welcome to the Pi Server, powered by .NET</h1>
</body>
</html>
Return to the program.cs code file, and edit it to use the default files.
NOTE: Ordering of commands is important here
var builder = WebApplication.CreateBuilder(args);
var app = builder.Build();
app.UseDefaultFiles();
app.UseStaticFiles();

app.Run();
This is the whole program to serve up the HTML pages in the wwwroot folder created earlier.
In the Terminal window run the program again (remember to replace IP_ADDRESS with the IP address of the Raspberry Pi)
dotnet run --urls=http://IP_ADDRESS:8080/
Test the web site by opening the browser on another machine and entering the URL address into the address bar.
Back in the Raspberry Pi Terminal press ctrl+c to stop running the web app.
Display a video
To display a video on this index.html web page download a small video from a website. A small video is fine for this example. Save the example video it in the wwwroot folder/
Example videos can be downloaded from fileexamples.com.
In Visual Studio Code edit the index.html page to include the video
<!doctype html>
<html>
<head>
<title>Pi Server Home</title>
</head>
<body>
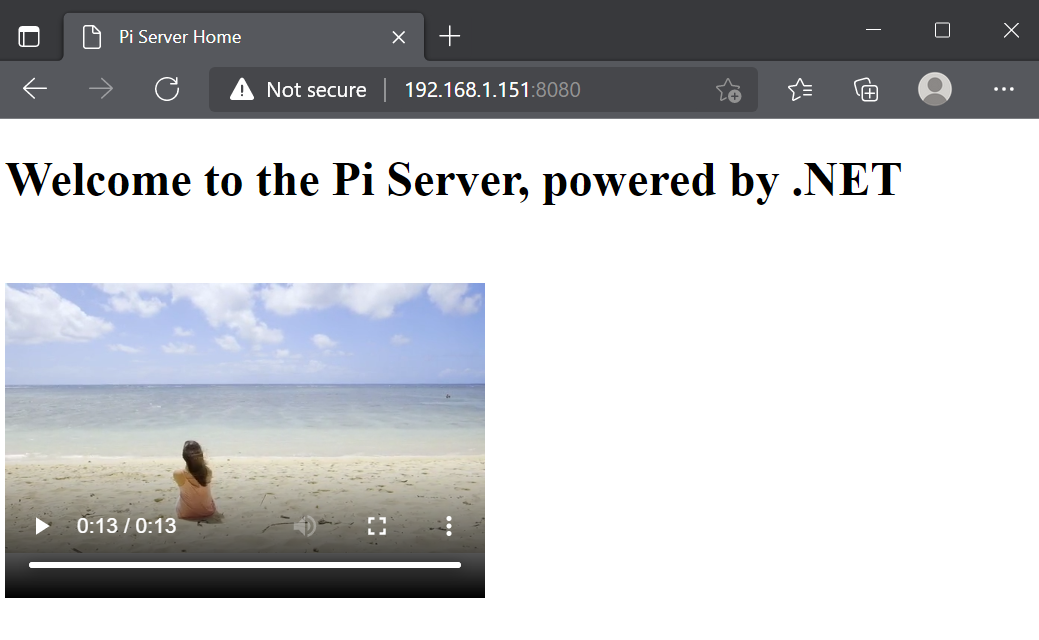
<h1>Welcome to the Pi Server, powered by .NET</h1>
<video width="320" height="240" controls autoplay>
<source src="sample_640x360.mp4" type='video/mp4'>
</video>
</body>
</html>
In the Terminal window run the program again (remember to replace IP_ADDRESS with the IP address of the Raspberry Pi)
dotnet run --urls=http://IP_ADDRESS:8080/
Test the web site by opening the browser on another machine and entering the URL address into the address bar.
You should see the video served from the web app in the web page.
Back in the Terminal press ctrl+c to stop running the web app.
Conclusions
In this Note a new web application was created on a Raspberry Pi to display a video on a web page.
The code was built and tested on a Raspberry Pi, however this code should run on any platform supported by .NET 6.
I hope this has helped you understand a few aspects of building a simple .NET 6 web application.