Dr. Neil's Notes
Software > Coding
.NET Picture Frame application on Raspberry Pi with Avalonia
Introduction
In previous Notes I have documented how to get a Raspberry Pi setup to develop with .NET, a few simple console programs that Animate ASCII art, display a clock, and display the weather. A recent Note explained how to create a .NET GUI application on Raspberry Pi with Avalonia.
In this Note I explain how to build a desktop GUI application on the Raspberry Pi that displays a series of pictures. The graphical user interface (or GUI) will be built using an open source GUI toolkit called Avalonia.
Before reading this Note, it is recommended you read the Note on how to create a .NET GUI application on Raspberry Pi with Avalonia.
The code shown in this Note may work on other platforms supported by .NET 6, it has been tested on a Raspberry Pi, Windows, and Mac.
If you want to get a Raspberry Pi setup to run .NET code, follow the instructions in the .NET Development on a Raspberry Pi Note.
This Note assumes you have installed .NET 6 and Visual Studio Code.
Create the project
If there is not already a folder for code projects, create a folder for code projects. I created a folder called dev.
Open a Terminal window on the Raspberry Pi, and navigate to the folder where you want to create the new folder (e.g. Documents), then enter
 mkdir dev
 ```

This makes the directory **dev**

Navigate to that directory

```console
 cd dev
 ```

Create a directory for this project, named **dotnetPiPictureFrame**

```console
 mkdir dotnetPiPictureFrame
 ```

Change the directory to the new folder created.

```console
 cd dotnetPiPictureFrame/
 ```

If you have not already installed the Avalonia project templates, install the project templates for Avalonia

```console
dotnet new -i Avalonia.Templates
Create a simple Avalonia GUI application with the following command
dotnet new avalonia.app
To see the files created, use the
tree command
~/Documents/dev/dotnetPiPictureFrame $ tree
.
├── App.axaml
├── App.axaml.cs
├── dotnetPiPictureFrame.csproj
├── MainWindow.axaml
├── MainWindow.axaml.cs
└── Program.cs

0 directories, 6 files
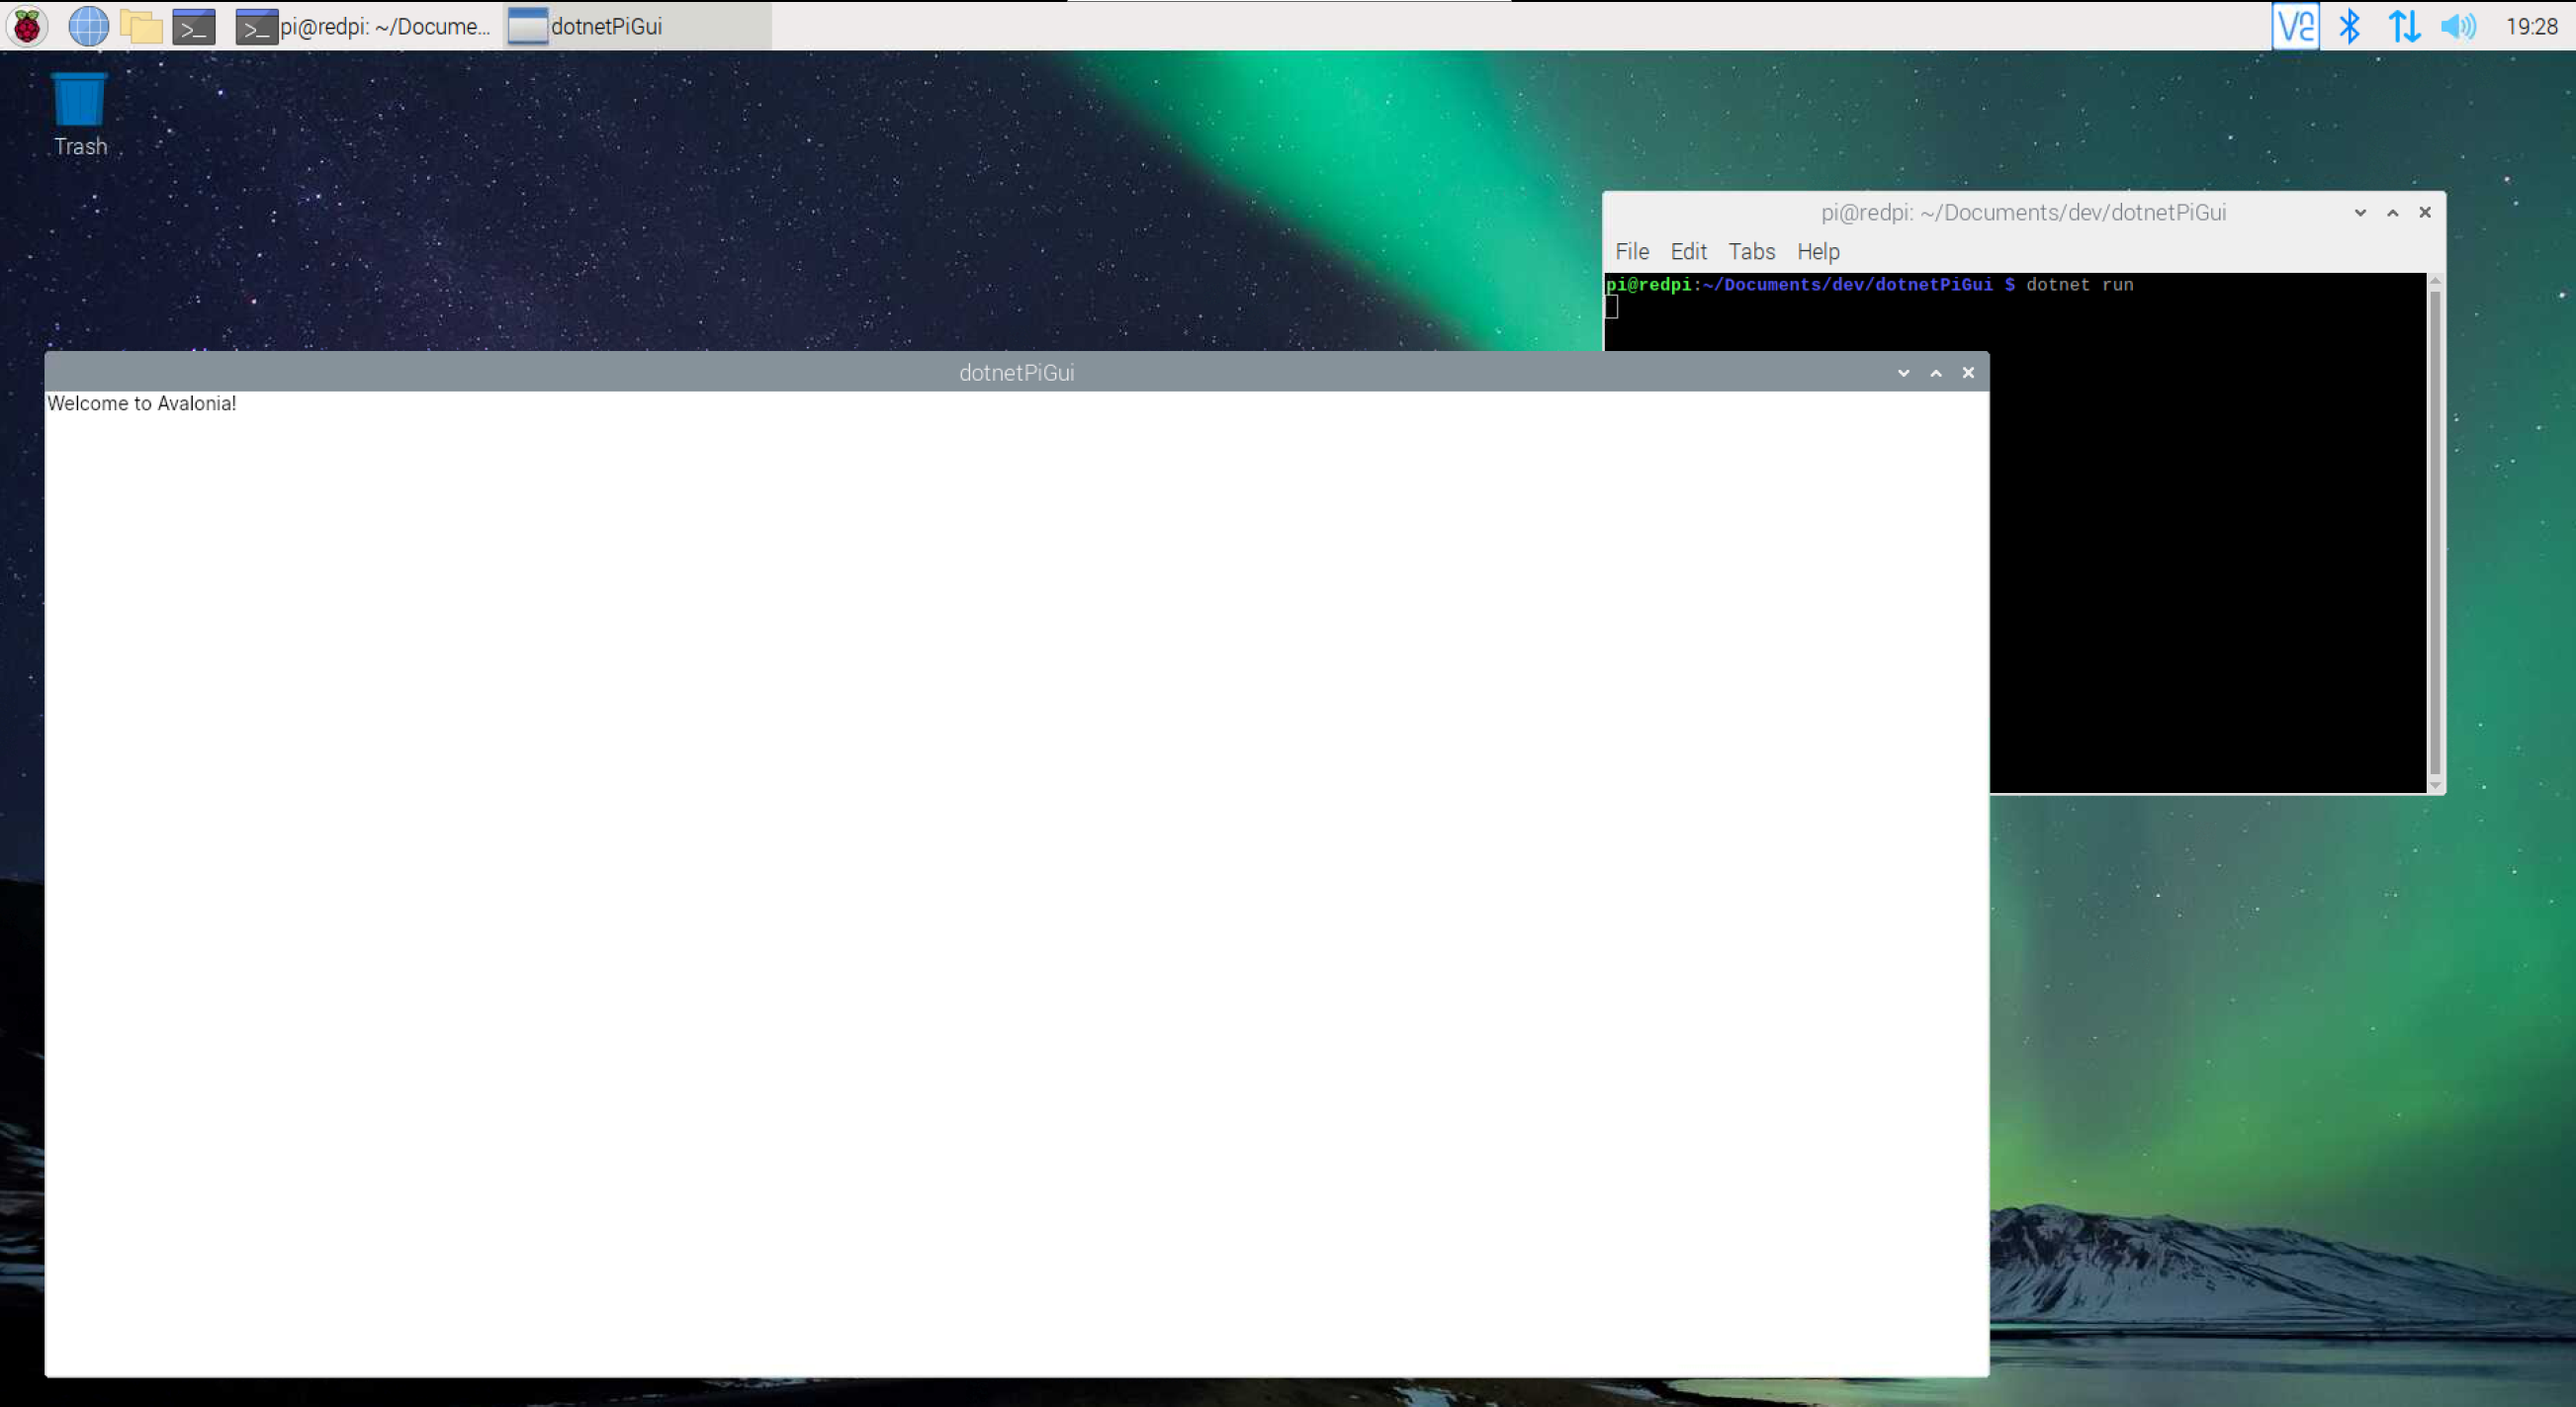
Compile and run the new application from the Terminal window with dotnet run
The dotnet run command will compile the project code in the current folder and run it.
dotnet run
The project will be built and then run, showing a simple blank window with the text 'Welcome to Avalonia!'
Close the new application by clicking on the close (X) button in the top right on the window.
Display an Image
Open Visual Studio Code from the dotnetPiPictureFrame folder
code .
In the root folder create a new code file named PictureConverter.cs. This class will implement an IValueConverter interface.
This class will convert a file path of an image file to be loaded as a bitmap, to display in the window.
In the Note on how to create a .NET GUI application on Raspberry Pi with Avalonia the time and weather were displayed by binding a string to the Text value of a TextBlock. With an Image control the source of the image needs to be bound to a bitmap. However images are stored as files, and the file path is a string. This PictureConverter class will take a file path and attempt to load it as an image and return a Bitmap to be rendered.
The code should look like this.
using Avalonia.Data.Converters;
using Avalonia.Media.Imaging;
using System;
using System.Globalization;
using System.IO;

namespace dotnetPiPictureFrame
{
    internal class PictureConverter : IValueConverter
    {
        public object? Convert(object? value, Type targetType, object? parameter, CultureInfo culture)
        {
            if (value == null)
                return null;

            if (value is string filepath
             && File.Exists(filepath))
            {
                return new Bitmap(filepath);
            }

            throw new NotSupportedException();
        }

        public object? ConvertBack(object? value, Type targetType, object? parameter, CultureInfo culture)
        {
            throw new NotImplementedException();
        }
    }
}
The important work this code is doing happens in these lines
if (value is string filepath
    && File.Exists(filepath))
{
    return new Bitmap(filepath);
}
The value being converted can be any type of object, so the first check is if the value is a string. Then the File.Exists method returns true if the filepath is a valid file. An extra check at this point would be to make sure the file is an image. For now it is assumed it is an image.
Given a valid file path, a Bitmap is loaded from the file, and returned as the converted object.
Save the PictureConverter.cs file.
To make the binding simpler the ReactiveUI library will be used to help notify the user interface when a bound value changes. In the Note on how to create a .NET GUI application on Raspberry Pi with Avalonia the INotifyPropertyChanged interface was implemented. The ReactiveUI library makes this even simpler.
In the Terminal (in the dotnetPiPictureFrame folder) enter
dotnet add package ReactiveUI
Return to Visual Studio Code and create a new code file named PictureViewModel.cs.
The PictureViewModel class will expose the path to a picture as a property named Path. The class will inherit from a ReactiveObject. The ReactiveObject comes from the ReactiveUI library added in the previous step.
An important line to note in the code is
this.RaiseAndSetIfChanged(ref path, value);
This RaiseAndSetIfChanged will update the private path member, and raise a notification to any objects listening for changes, such as a user interface object such as an Image
using ReactiveUI;

namespace dotnetPiPictureFrame
{
    public class PictureViewModel : ReactiveObject
    {
        string? path;

        public string? Path
        {
            get => path;
            set => this.RaiseAndSetIfChanged(ref path, value);
        }
    }
}
Save the PictureViewModel.cs file.
In Visual Studio Code open the MainWindow.axaml file to update the visual elements displayed in the window.
In the Window element attributes add a namespace reference for the namespace of this project dotnetPiPictureFrame
xmlns:local="using:dotnetPiPictureFrame"
Also edit the Title attribute, and add a Background attribute for the Window element.
    Title="PictureFrame"
    Background="Black"
The Window element should now look like this.
<Window xmlns="https://github.com/avaloniaui"
        xmlns:x="http://schemas.microsoft.com/winfx/2006/xaml"
        xmlns:d="http://schemas.microsoft.com/expression/blend/2008"
        xmlns:mc="http://schemas.openxmlformats.org/markup-compatibility/2006"
        xmlns:local="using:dotnetPiPictureFrame"
        mc:Ignorable="d" d:DesignWidth="800" d:DesignHeight="450"
        x:Class="dotnetPiPictureFrame.MainWindow"
        Title="PictureFrame"
        Background="Black">
Directly below the Window opening element (shown above) add a Window.Resources element. This element will contain a mapping of the PictureConverter class created earlier to a resource that can be used in this Window. The Key picConverter provides a way to access the resource. This will be used in the next step.
    <Window.Resources>
        <local:PictureConverter x:Key="picConverter"/>
    </Window.Resources>
In the contents of the Window element, replace the Hello Avalonia! text with an Image element.
The Image has a Source that defines the image to display, this is bound to a Path property (sound familiar) and uses the picConverter resources to convert the Path into a bitmap.
<Image x:Name="Picture" Source="{Binding Path, Converter={StaticResource picConverter}}"/>
Save the MainWindow.axaml file.
In Visual Studio Code open the MainWindow.axaml.cs file to add a small amount of code that allows an image to be displayed on the screen.
In the MainWindow class add a new instance of the PictureViewModel class declared earlier.
public PictureViewModel pictureVM = new PictureViewModel();
In the constructor of the MainWindow class set the DataContext to the pictureVM variable just declared.
Then set the Path to the file path of an image file, for example /home/pi/Pictures/field.jpg.
Make sure you have that file on your device.
public MainWindow()
{
    InitializeComponent();
    DataContext = pictureVM;
    pictureVM.Path = @"PATH TO IMAGE FILE";
}
Save the MainWindow.axaml.cs file.
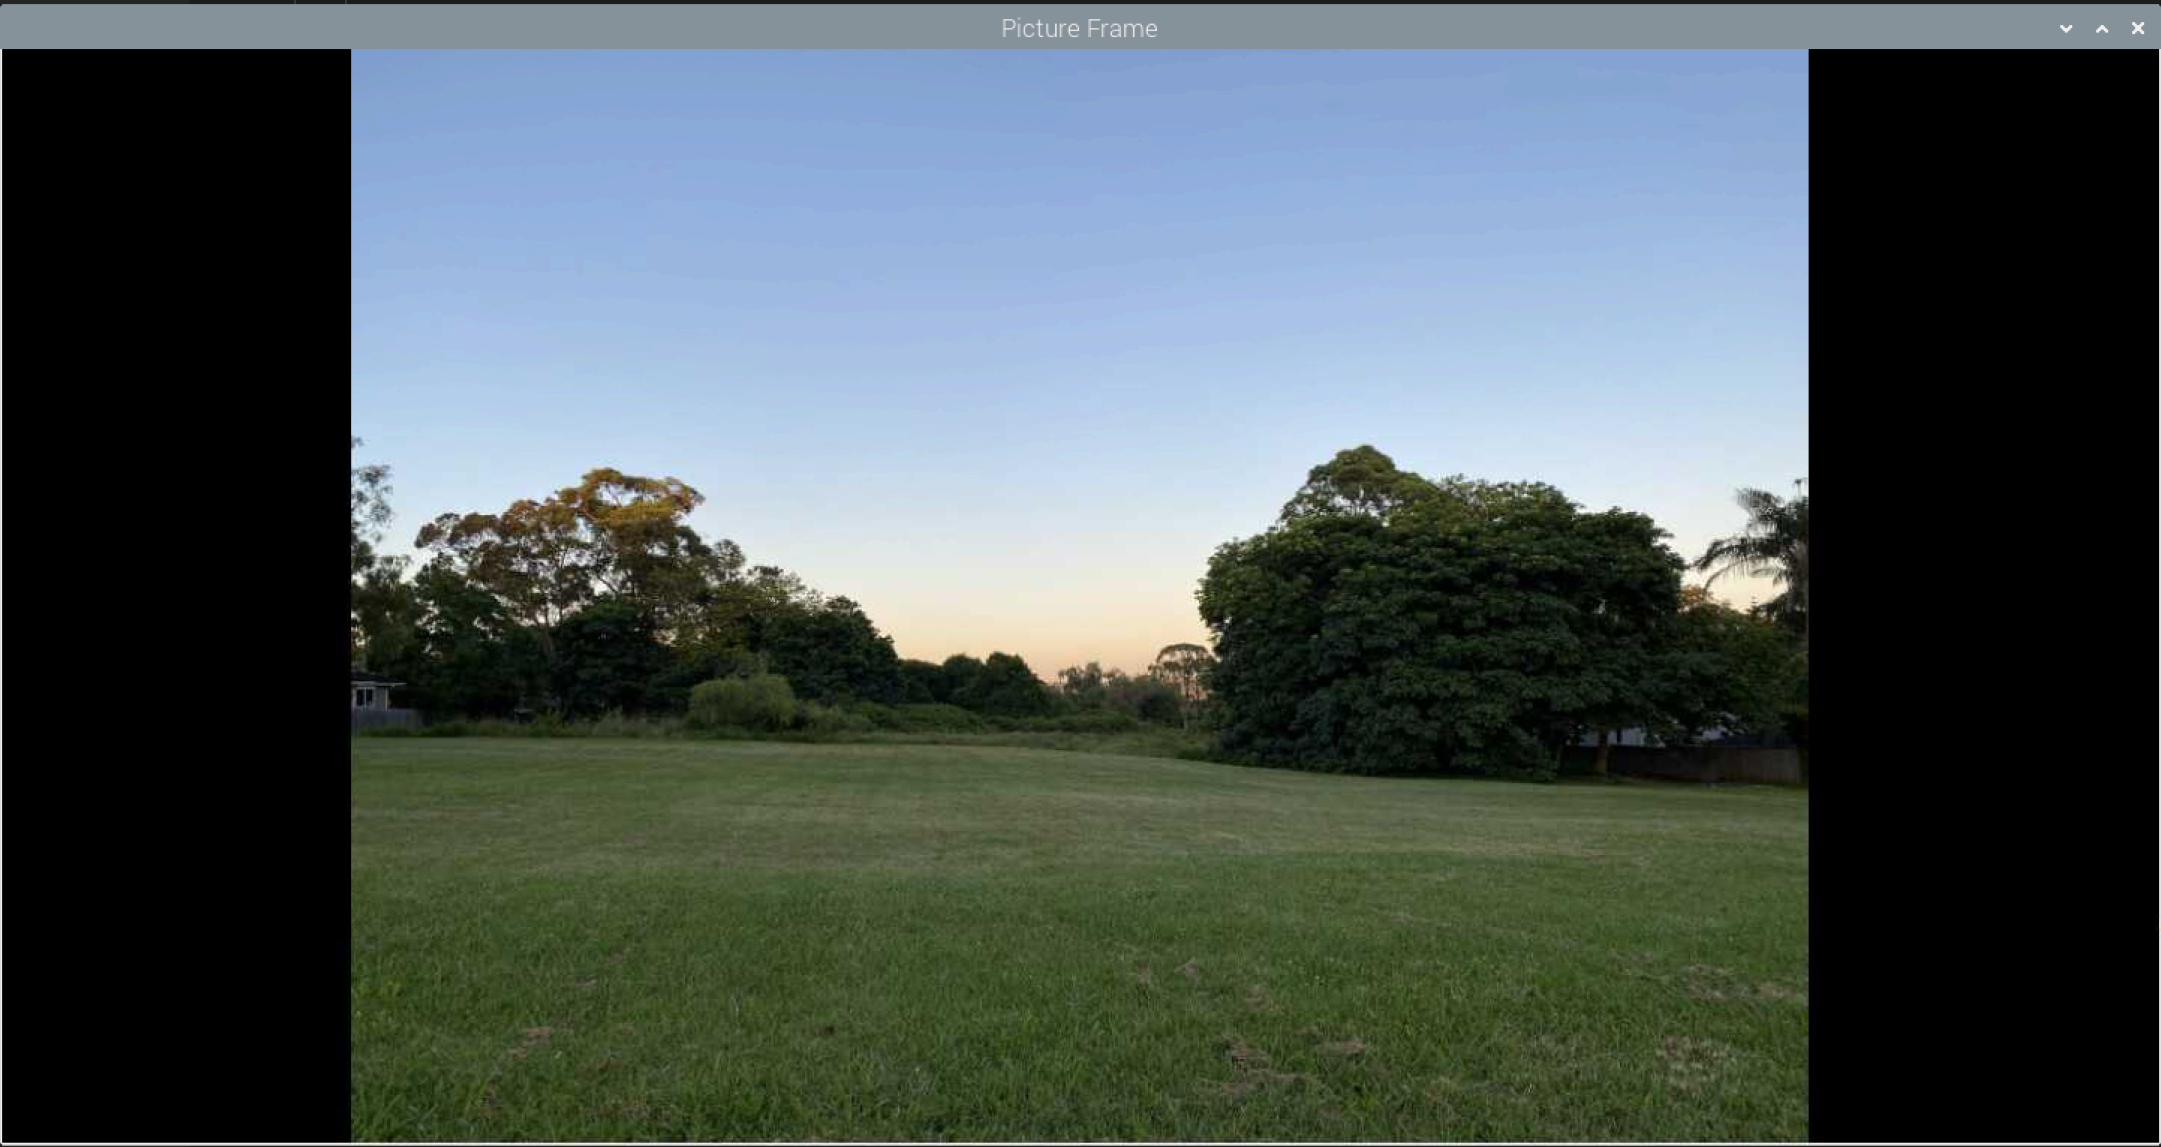
Compile and run the new application from the Terminal window with dotnet run
The dotnet run command will compile the project code in the current folder and run it.
dotnet run
The project will be built and then run, showing a simple black window with an image on the screen. If you do not see an image then check that the path in previous step is set to a valid path on your device, and that the file at that path is an image.
Close the new application by clicking on the close (X) button in the top right on the window.
Change the Image
Showing a single image is rather boring, the code in this section will display each image in a folder in turn.
In Visual Studio Code open the MainWindow.axaml.cs file.
At the top of the file below the last using statement, add the following using namespaces. These namespaces will support reading from the file system, and threading to iterate through the images in a folder.
using System.IO;
using System.Threading.Tasks;
In the MainWindow constructor remove the line that sets the image path, and add lines to start a new thread to call the UpdateGUI method. This is similar to the steps used in the Note on how to create a .NET GUI application on Raspberry Pi with Avalonia to update the clock.
public MainWindow()
{
    InitializeComponent();
    DataContext = pictureVM;
    Task.Run(async() => await UpdateGUI());
}
In the MainWindow class add the UpdateGUI method to get a list of the jpg files from a folder. On the Raspberry Pi the /home/pi/Pictures folder can be used (make sure you save some images in the folder), on other platforms change this to the path of a folder that has images.
The while loop then changes the Path of the pictureVM to the file path of a file in the folder.
Then waits 10 seconds (10000 milliseconds) before looping again.
private async Task UpdateGUI()
{
    var files = Directory.GetFiles(@"/home/pi/Pictures", "*.jpg");
    int currentFile = 0;
    while (true)
    {
        pictureVM.Path = files[currentFile];
        currentFile++;
        if (currentFile >= files.Length)
        {
            currentFile = 0;
        }
        await Task.Delay(10000);
    }
}
Save the MainWindow.axaml.cs file.
Compile and run the new application from the Terminal window with dotnet run
dotnet run
The project will be built and then run, each jpg image in the folder referenced should be shown for 10 seconds. If you do not see any images, then make sure the folder is correct and the folder contains several jpg files.
Close the new application by clicking on the close (X) button in the top right on the window.
Animate the Image
In the previous step the images change suddenly. The following code will animate the images in and out of the screen.
In Visual Studio Code open the MainWindow.axaml file.
Below the </Window.Resources> element add the following <Window.Styles>.
Two Style animations are defined, one for exiting and one for entering. These will be used to animate the image exiting and entering the screen.
<Window.Styles>
    <Style Selector="Image.exiting">
        <Style.Animations>
        <Animation Duration="0:0:1" FillMode="Forward">
            <KeyFrame Cue="0%">
            <Setter Property="Opacity" Value="1.0"/>
            <Setter Property="TranslateTransform.X" Value="0.0"/>
            </KeyFrame>
            <KeyFrame Cue="100%">
            <Setter Property="Opacity" Value="0.0"/>
            <Setter Property="TranslateTransform.X" Value="1920.0"/>
            </KeyFrame>
        </Animation>
        </Style.Animations>
    </Style>
    <Style Selector="Image.entering">
    <Style.Animations>
        <Animation Duration="0:0:1" FillMode="Forward">
        <KeyFrame Cue="0%">
            <Setter Property="Opacity" Value="0.0"/>
            <Setter Property="TranslateTransform.X" Value="-1920.0"/>
        </KeyFrame>
        <KeyFrame Cue="100%">
            <Setter Property="Opacity" Value="1.0"/>
            <Setter Property="TranslateTransform.X" Value="0.0"/>
        </KeyFrame>
        </Animation>
    </Style.Animations>
    </Style>
</Window.Styles>
The exiting style contains an Animation that animates the Opacity from 1.0 (fully opaque), to 0.0 (transparent), and also animates the horizontal position of the image with TranslateTransform.X from 0.0 to 1920.0. This will make the image fade and slide towards the right of the screen.
The entering style contains an Animation that animates the Opacity from 0.0 (transparent), to 1.0 (opaque), and also animates the horizontal position of the image with TranslateTransform.X from -1920.0 to 0.0. This will make the image fade in and slide in from the left of the screen.
Save the MainWindow.axaml file.
In Visual Studio Code open the MainWindow.axaml.cs file.
At the top of the file add another namespace using for Avalonia.Threading.
using Avalonia.Threading;
In the MainWindow class below the declaration of the pictureVM variable add a declaration of an Image
Image? image;
At the end of the MainWindow constructor method add code to retrieve the Image named Picture.
image = this.FindControl<Image>("Picture");
This Picture name is given to the Image in the MainWindow.axaml file.
Edit the UpdateGUI method to change the image between having the entering and exiting class in the list of classes. The class is used to define which animation should be played.
After the exiting class is added the delay is set to 1 second (1000 milliseconds), after the entering class is set the delay is set to 10 seconds (10000 milliseconds).
Note: changing the image.Classes requires calling the Dispatcher.UIThread.Post method. The image object belongs to the thread that renders the user interface, any changes made to it need to be done in the same thread.
private async Task UpdateGUI()
{
    var files = Directory.GetFiles(@"/home/pi/Pictures", "*.jpg");
    int currentFile = 0;
    bool entering = false;
    while (true)
    {
        if (image is not null)
        {
            if (entering)
            {
                Dispatcher.UIThread.Post(() => image.Classes.Remove("exiting"));
                pictureVM.Path = files[currentFile];
                currentFile++;
                if (currentFile >= files.Length)
                {
                    currentFile = 0;
                }
                Dispatcher.UIThread.Post(() => image.Classes.Add("entering"));
                await Task.Delay(10000);
            }
            else
            {
                Dispatcher.UIThread.Post(() => image.Classes.Remove("entering"));
                Dispatcher.UIThread.Post(() => image.Classes.Add("exiting"));
                await Task.Delay(   1000);
            }
        }
        entering = !entering;
    }
}
Save the MainWindow.axaml.cs file.
Compile and run the new application from the Terminal window with dotnet run
dotnet run
The project will be built and then run, each jpg image in the folder referenced should be shown for 10 seconds then animate towards the right and fade, a second later a new image should slide in from the left of the window.
Close the new application by clicking on the close (X) button in the top right on the window.
Conclusion
In this Note an Avalonia app has been created in .NET 6 that can animate a series of images in a folder on the screen. This was built on a Raspberry Pi and could be turned into software that runs a picture frame by making the Window full screen and hiding the title bar.
Optional Make the Window Full Screen
To make the window full screen and hide the title bar add the following attributes to the Window element in the MainWindow.axaml file.
SystemDecorations="None"
WindowState="FullScreen"
Complete Code Listings
Below are the complete code listings for this Note.
You can also find a version of the code, along with some guides on building a Digital Picture Frame on this dotnetPiPictureFrame GitHub repository
MainWindow.axaml
<Window xmlns="https://github.com/avaloniaui"
    xmlns:x="http://schemas.microsoft.com/winfx/2006/xaml"
    xmlns:d="http://schemas.microsoft.com/expression/blend/2008"
    xmlns:mc="http://schemas.openxmlformats.org/markup-compatibility/2006"
    xmlns:local="using:dotnetPiPictureFrame"
    mc:Ignorable="d" d:DesignWidth="800" d:DesignHeight="450"
    x:Class="dotnetPiPictureFrame.MainWindow"
    Title="Picture Frame"
    Background="Black">
    <Window.Resources>
        <local:PictureConverter x:Key="picConverter"/>
    </Window.Resources>
    <Window.Styles>
        <Style Selector="Image.exiting">
            <Style.Animations>
                <Animation Duration="0:0:1" FillMode="Forward">
                    <KeyFrame Cue="0%">
                    <Setter Property="Opacity" Value="1.0"/>
                    <Setter Property="TranslateTransform.X" Value="0.0"/>
                    </KeyFrame>
                    <KeyFrame Cue="100%">
                    <Setter Property="Opacity" Value="0.0"/>
                    <Setter Property="TranslateTransform.X" Value="1920.0"/>
                    </KeyFrame>
                </Animation>
            </Style.Animations>
        </Style>
        <Style Selector="Image.entering">
            <Style.Animations>
                <Animation Duration="0:0:1" FillMode="Forward">
                    <KeyFrame Cue="0%">
                        <Setter Property="Opacity" Value="0.0"/>
                    <Setter Property="TranslateTransform.X" Value="-1920.0"/>
                    </KeyFrame>
                    <KeyFrame Cue="100%">
                        <Setter Property="Opacity" Value="1.0"/>
                        <Setter Property="TranslateTransform.X" Value="0.0"/>
                    </KeyFrame>
                </Animation>
            </Style.Animations>
        </Style>
    </Window.Styles>
    <Image x:Name="Picture" Source="{Binding Path, Converter={StaticResource picConverter}}"/>
</Window>
MainWindow.axaml.cs
using Avalonia.Controls;
using Avalonia.Threading;
using System.IO;
using System.Threading;
using System.Threading.Tasks;

namespace dotnetPiPictureFrame
{
    public partial class MainWindow : Window
    {
        public PictureViewModel pictureVM = new PictureViewModel();
        Image? image;

        public MainWindow()
        {
            InitializeComponent();
            DataContext = pictureVM;
            image = this.FindControl<Image>("Picture");
            var t = new Thread(new ThreadStart(async () => await UpdateGUI()));
            t.Start();
        }

        private async Task UpdateGUI()
        {
            var files = Directory.GetFiles(@"/home/pi/Pictures", "*.jpg");
            int currentFile = 0;
            bool entering = false;
            while (true)
            {
                if (image is not null)
                {
                    if (entering)
                    {
                        Dispatcher.UIThread.Post(() => image.Classes.Remove("exiting"));
                        pictureVM.Path = files[currentFile];
                        currentFile++;
                        if (currentFile >= files.Length)
                        {
                            currentFile = 0;
                        }
                        Dispatcher.UIThread.Post(() => image.Classes.Add("entering"));
                        await Task.Delay(10000);
                    }
                    else
                    {
                        Dispatcher.UIThread.Post(() => image.Classes.Remove("entering"));
                        Dispatcher.UIThread.Post(()=>image.Classes.Add("exiting"));
                        await Task.Delay(1000);
                    }
                }
                entering = !entering;
            }
        }
    }
}