Dr. Neil's Notes
Software > Coding
.NET Camera on a Raspberry Pi
Introduction
After getting .NET 6 and Visual Studio Code running on a Raspberry Pi, I wrote some simple .NET 6 console code. The .NET Console Animations, .NET Console Clock, and .NET Console Weather projects are all able to run on a Raspberry Pi, and will work on any other platform that can run .NET 6.
In this Note, .NET 6 is used to control a camera attached to the Raspberry Pi. This uses an older Raspberry Pi 3 Model B Plus, along with the Raspberry Pi camera kit.
If you want to get a Raspberry Pi setup to run .NET code, follow the instructions in the .NET Development on a Raspberry Pi Note.
This Note assumes you have installed .NET 6 and Visual Studio Code on a Raspberry Pi.
This code will run on a Raspberry Pi, and possibly some of the other IoT devices supported by .NET 6. It has only been tested on a Raspberry Pi.
A video that accompanies this Note can be found here
Setting Up the Camera
In order to use the camera on a Raspberry Pi, the camera interface needs to be enabled.
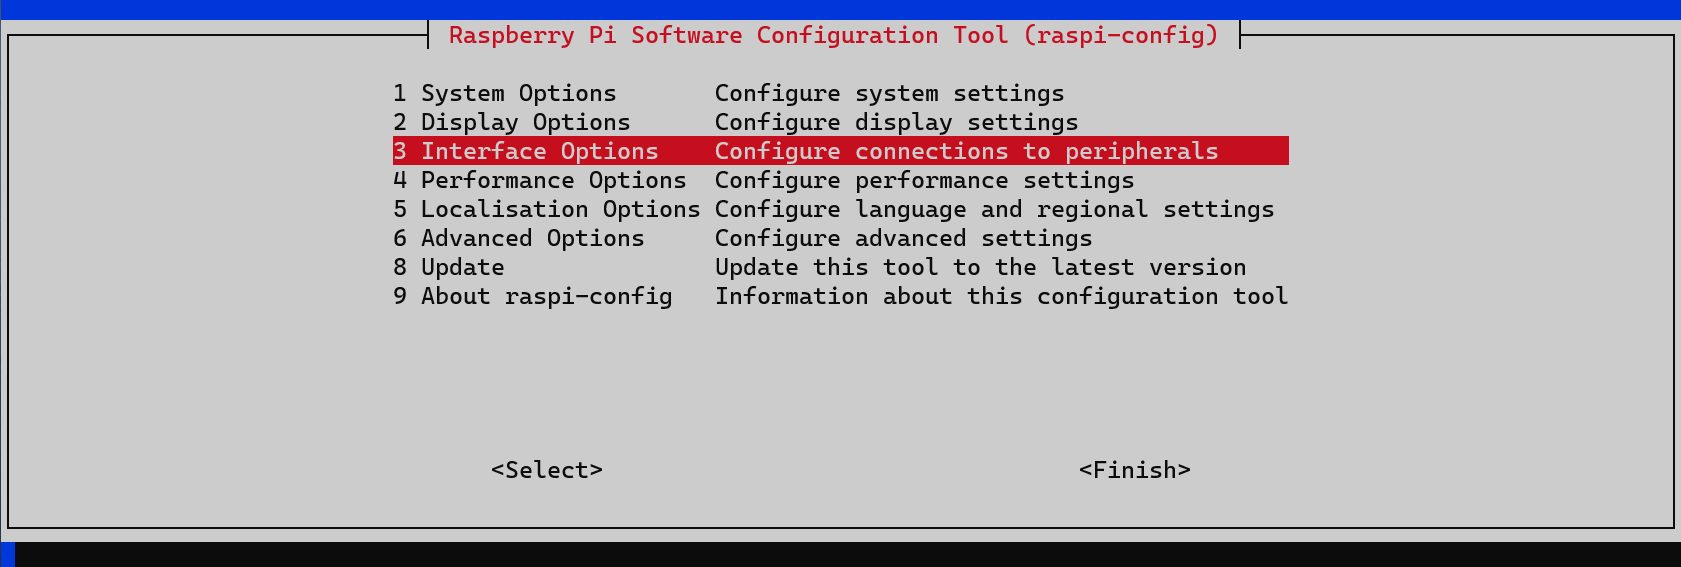
In a terminal (SSH or the Terminal on the Raspberry Pi) run the sudo raspi-config command to configure the camera.
Select the Interface Options and click the enter key
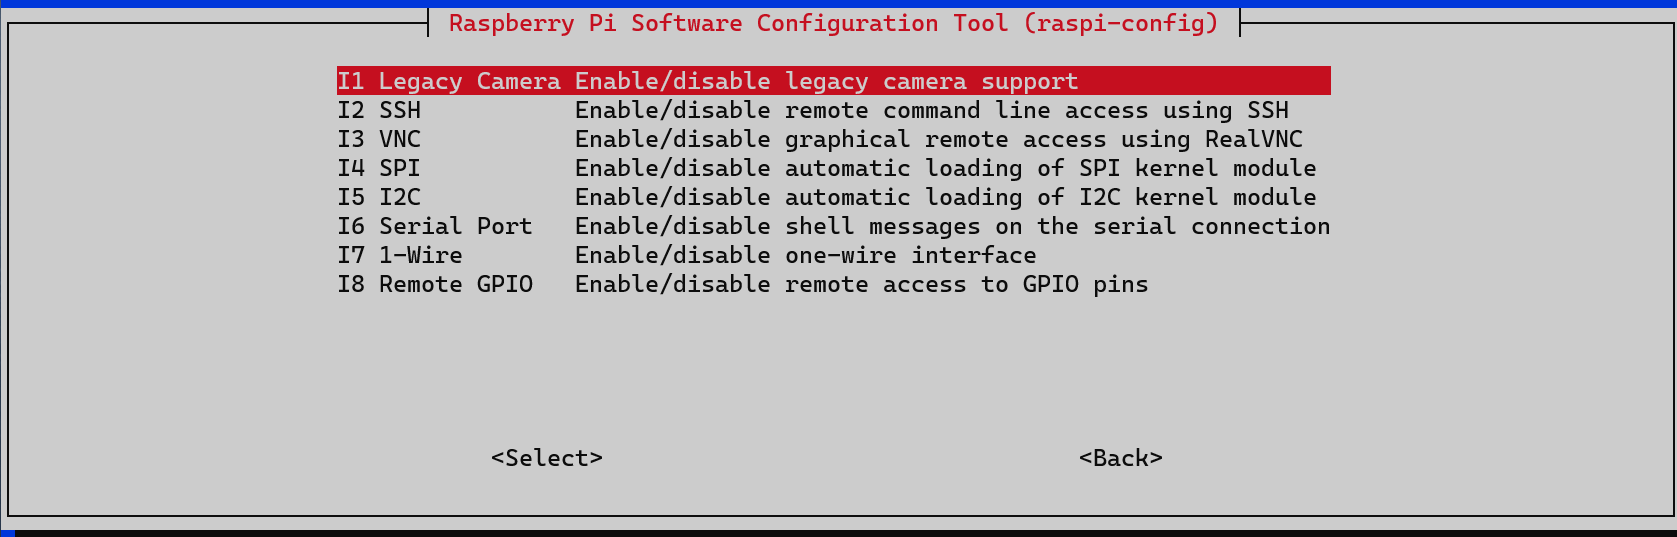
Select the Legacy Camera option, and press enter.
Select Yes (using the arrow keys), and press enter
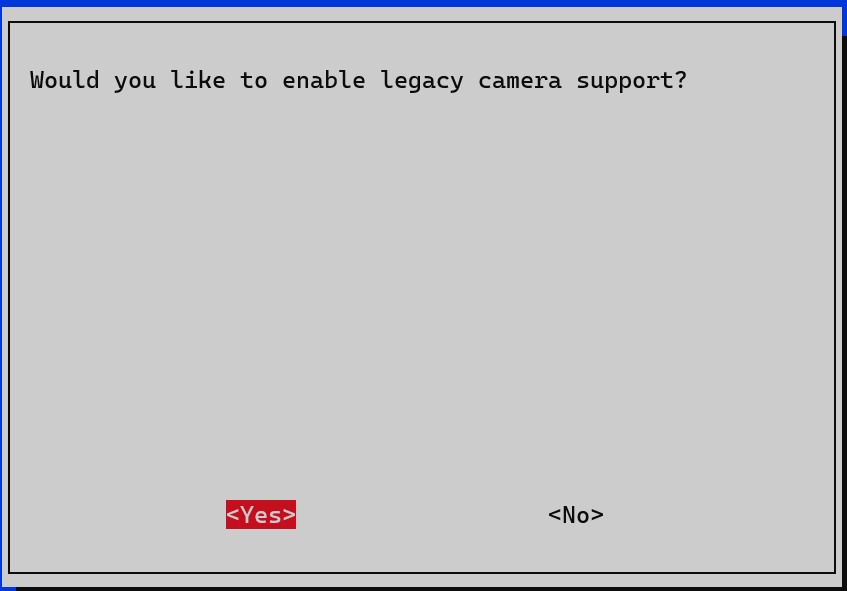
Allow this feature, even if it is reported as deprecated.
Then exit and, if required, reboot the Raspberry Pi.
Return to the Raspberry Pi Terminal (either SSH or the Terminal on the Raspberry Pi), and enter the following two commands to install the libraries required to communicate with the camera.
sudo apt-get install v4l-utils

sudo apt-get install libc6-dev libgdiplus libx11-dev
Create a new project
If there is not already a folder on the Raspberry Pi for code projects, create a folder for code projects. I created a folder called dev.
Open a Terminal session and navigate to the folder where you want to create the new folder (eg Documents) and enter
mkdir dev
This makes the directory dev
Navigate to that directory
cd dev
then open Visual Studio Code. Note the 'dot' after the code, this tells Visual Studio Code to open the current folder.
code .
The terminal entries should look something like this:
~ $ cd Documents/
~/Documents $ mkdir dev
~/Documents $ cd dev/
~/Documents/dev $ code .
~/Documents/dev $
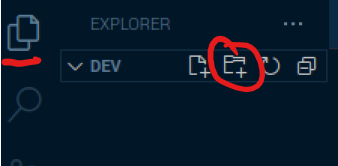
In Visual Studio Code create a new folder in the code (dev) folder, call it dotnetPiCam
Make sure you have the Explorer open (Ctrl+Shift+E), then click the New Folder icon, and name the new folder dotnetPiCam
Open the Terminal window in Visual Studio Code, you can use the menu to select Terminal - New Terminal or press Ctrl+Shift+`
The Terminal will open along the bottom of the Visual Studio Code window and it will open in the folder you have opened with Visual Studio Code. In this case it will be the dev folder.
Change the directory to the new folder just created.
cd dotnetPiCam/
To create the .NET 6 console application use the command
dotnet new console
The default name of the new project is the name of the folder in which the project is being created.
The output should look like this.
~/Documents/dev/dotnetPiCam $ dotnet new console
The template "Console App" was created successfully.

Processing post-creation actions...
Running 'dotnet restore' on /home/pi/Documents/dev/dotnetPiCam/dotnetPiCam.csproj...
  Determining projects to restore...
  Restored /home/pi/Documents/dev/dotnetPiCam/dotnetPiCam.csproj (in 590 ms).
Restore succeeded.
Also notice that files have been created in the Explorer view of Visual Studio Code
Run the new application from the Terminal window in Visual Studio Code with
dotnet run
This dotnet run command will compile the project code in the current folder and run it.
~/Documents/dev/dotnetPiCam $ dotnet run
Hello, World!
It does not do much yet, other than output Hello, World!
Get supported camera options
The initial step is to validate the code can connect to the camera attached to the Raspberry Pi and get the capabilites of the camera.
In Visual Studio Code open the project file, dotnetPiCam.csproj
Add project references to the dotnet IoT libraries to a new ItemGroup as shown here
<Project Sdk="Microsoft.NET.Sdk">
   <PropertyGroup>
      <OutputType>Exe</OutputType>
      <TargetFramework>net6.0</TargetFramework>
      <ImplicitUsings>enable</ImplicitUsings>
      <Nullable>enable</Nullable>
   </PropertyGroup>
   <ItemGroup>
      <PackageReference Include="System.Device.Gpio" Version="2.0.0" />
      <PackageReference Include="Iot.Device.Bindings" Version="2.0.0" />
   </ItemGroup>
</Project>
Open the Program.cs code file and replace the existing two lines with the following code.
This code will output the list of supported formats and resolutions for the camera.
using Iot.Device.Media;

Console.WriteLine("Getting information about your camera...");

VideoConnectionSettings settings = new VideoConnectionSettings(busId: 0, captureSize: (2592, 1944), pixelFormat: PixelFormat.JPEG);

using VideoDevice device = VideoDevice.Create(settings);

IEnumerable<PixelFormat> formats = device.GetSupportedPixelFormats();

foreach (var format in formats)
{
    Console.WriteLine($"Pixel Format {format}");
    IEnumerable<Resolution> resolutions = device.GetPixelFormatResolutions(format);
    if (resolutions is not null)
    {
        foreach (var res in resolutions)
        {
            Console.WriteLine($"   min res: {res.MinWidth} x {res.MinHeight} ");
            Console.WriteLine($"   max res: {res.MaxWidth} x {res.MaxHeight} ");
        }
    }
}
Save the two edited files.
In the Terminal window, enter the dotnet run command to compile and run the application.
When this program is run in the terminal with dotnet run, the result is a list of the formats, and resolutions for each format, supported by the camera attached to the Raspberry Pi.
If the list looks a lot shorter than this (it only has 2 or 3 items) it is possible the 'Legacy Camera' option has not been set correctly, check the previous step.
~/Documents/dev/dotnetIoT $ dotnet run
Getting information about your camera...
Pixel Format YUV420
   min res: 32 x 32
   max res: 2592 x 1944
Pixel Format YUYV
   min res: 32 x 32
   max res: 2592 x 1944
Pixel Format RGB24
   min res: 32 x 32
   max res: 2592 x 1944
Pixel Format JPEG
   min res: 32 x 32
   max res: 2592 x 1944
Pixel Format H264
   min res: 32 x 32
   max res: 2592 x 1944
Pixel Format MJPEG
   min res: 32 x 32
   max res: 2592 x 1944
Pixel Format YVYU
   min res: 32 x 32
   max res: 2592 x 1944
Pixel Format VYUY
   min res: 32 x 32
   max res: 2592 x 1944
Pixel Format UYVY
   min res: 32 x 32
   max res: 2592 x 1944
Pixel Format NV12
   min res: 32 x 32
   max res: 2592 x 1944
Pixel Format BGR24
   min res: 32 x 32
   max res: 2592 x 1944
Pixel Format YVU420
   min res: 32 x 32
   max res: 2592 x 1944
Pixel Format NV21
   min res: 32 x 32
   max res: 2592 x 1944
Pixel Format BGRX32
   min res: 32 x 32
   max res: 2592 x 1944
This code creates a new VideoDevice object, for a specific size and format, however that is not yet used. The setting that is used is the busId, which is set to 0. Computer hardware communicates with other hardware using physical connections, these connections are known as Buses, the default Bus for the Raspberry Pi camera is Bus number 0.
By adding the using at the start of the line that creates the VideoDevice, the device object created, and any resources it uses, will be correctly cleaned up when the device variable goes out of scope. In this case the device variable goes out of scope when the program finishes.
VideoConnectionSettings settings = new VideoConnectionSettings(busId: 0, captureSize: (2592, 1944), pixelFormat: PixelFormat.JPEG);

using VideoDevice device = VideoDevice.Create(settings);
With a VideoDevice object created and stored in the device variable, the device variable can be queried for the formats supported on that camera, with the GetDevicePixelFormats method. This method returns a collection of PixelFormat objects.
An IEnumerable is any object that supports the IEnumerable interface, it might be a List or an Array, the implementation is not important, by supporting IEnumerable the collection can be enumerated, meaning that foreach loop can be used to walk through each item in the collection.
IEnumerable<PixelFormat> formats = device.GetSupportedPixelFormats();
For each of the PixelFormat types supported by the camera, there could be multiple resolutions available. Calling the GetPixelFormatResolutions method with the PixelFormat provides a collection of Resolution objects. This collection of Resolution objects can also be enumerated with the minimum and maximum resolutions output to the terminal.
IEnumerable<Resolution> resolutions = device.GetPixelFormatResolutions(format);
Capture an image
With the knowledge that the camera is connected, and can be addressed from the code, it is now possible to capture an image from the camera.
Edit the code in the Program.cs code file, remove the code that retrieves of the formats and resolutions, and instead use the camera to capture an image, and save it to the Pictures folder on the Raspberry Pi.
The code in the Program.cs file should now look like this.
using Iot.Device.Media;

VideoConnectionSettings settings = new VideoConnectionSettings(busId: 0, captureSize: (2592, 1944), pixelFormat: PixelFormat.JPEG);

using VideoDevice device = VideoDevice.Create(settings);

Console.WriteLine("Smile, you are on camera");
device.Capture("/home/pi/Pictures/capture.jpg");
Save the Program.cs file, and in the Terminal window, enter the dotnet run command again, to compile and run the application.
When this program is run in the terminal with dotnet run, a picture should be captured from the camera. Look in the Pictures folder (assuming the currently logged in user is pi) and the capture.jpg file should be there, open it to see the picture taken.
This picture captured uses the settings provided in the in VideoConnectionSettings, meaning it should be a JPEG with a resolution of 2592 x 1944.
The code to capture a single image from the camera is as simple as this device.Capture("/home/pi/Pictures/capture.jpg");.
NOTE: depending on the camera attached to the Raspberry Pi different resolutions and formats might be available. This is why the previous step is important. If this code is not working, check the format and resolution is supported by the camera. If the format and resolution is not supported, pick a format and resolution that is supported.
Capture video frames
Capturing a single picture can be useful, however sometimes the requirement is to capture a video. A video is a set of image frames captured in rapid succession.
To understand how to capture a video file with the Raspberry Pi camera, this step will capture image frames while the camera is capturing.
In the Pictures folder on the Raspberry Pi, create a new Frames folder. Any other folder could also be used, this seemed like the obvious place to store captured images from the camera.
mkdir /home/pi/Pictures/Frames
Then edit the Program.cs code file to start a continuous capture until a key is pressed on the keyboard.
NOTE: the VideoSettings has been changed to reduce the captureSize to 640 x 480. This reduces the size of the frames captured, which is faster, and uses less storage space.
using Iot.Device.Media;

VideoConnectionSettings settings = new VideoConnectionSettings(busId: 0, captureSize: (640, 480), pixelFormat: PixelFormat.JPEG);

int frame = 0;

using VideoDevice device = VideoDevice.Create(settings);

device.NewImageBufferReady += NewImageBufferReadyEventHandler;

device.StartCaptureContinuous();

CancellationTokenSource tokenSource = new CancellationTokenSource();

new Thread(() => { device.CaptureContinuous(tokenSource.Token); }).Start();

Console.WriteLine("Capturing video, press any key to stop");

while (!Console.KeyAvailable)
{
    Thread.SpinWait(1);
}

tokenSource.Cancel();
device.StopCaptureContinuous();

void NewImageBufferReadyEventHandler(object sender, NewImageBufferReadyEventArgs e)
{
    try
    {
        File.WriteAllBytes($"/home/pi/Pictures/Frames/frame{frame}.jpg", e.ImageBuffer);
        frame++;
        Console.Write(".");
    }
    catch (ObjectDisposedException)
    {
        // ignore this as its thrown when the stream is stopped
    }
}
Save the Program.cs file, and in the Terminal window, enter the dotnet run command again to compile and run the application.
When this program is run in the terminal with dotnet run, the program starts capturing image frames and saving them in the Frames folder created in the Pictures folder. Do not leave this running for too long as it will fill up the storage with images quickly. Run for a couple of seconds and then click a key on the keyboard to stop the program.
As noted above the settings are changed to reduce the size of the frames captured.
VideoConnectionSettings settings = new VideoConnectionSettings(busId: 0, captureSize: (640, 480), pixelFormat: PixelFormat.JPEG);
A integer variable is created to count the number of frames saved, this frame variable is used to name the frame image files.
int frame = 0;
Whenever the camera has an image ready to be processed, in this case saved, an event called NewImageBufferReady is raised. This code adds a method to be called by the event. The NewImageBufferReadyEventHandler method code will be explained later in this step.
device.NewImageBufferReady += NewImageBufferReadyEventHandler;
The next three lines of code prepare the camera device to start capturing a continuous set of images.
The CancellationTokenSource object is a way to signal to the thread capturing the images that it should stop.
A Thread is a mechanism in software to provide the illusion of more than a single stream of activity happening at the same time. In some hardware this might actually happen at the same time, in other hardware, the processing time is shared between the threads.
device.StartCaptureContinuous();
CancellationTokenSource tokenSource = new CancellationTokenSource();
new Thread(() => { device.CaptureContinuous(tokenSource.Token); }).Start();
The program then waits for a keyboard key to be pressed, before doing any other work.
while (!Console.KeyAvailable)
{
    Thread.SpinWait(1);
}
Once a key press has been detected, the CancellationTokenSource is used to cancel (or stop) the thread running the CaptureContinuous on the camera.
Then the camera device is instructed to stop the continuous capture.
tokenSource.Cancel();
device.StopCaptureContinuous();
At the end of the code file is the method that gets called each time a new image is available from the camera, on the NewImageBufferReady event.
This writes all the bytes in the image to a file, using the frame variable to name the file. The frame variable is incremented by 1, and a . is written to the output.
void NewImageBufferReadyEventHandler(object sender, NewImageBufferReadyEventArgs e)
{
    try
    {
        File.WriteAllBytes($"/home/pi/Pictures/Frames/frame{frame}.jpg", e.ImageBuffer);
        frame++;
        Console.Write(".");
    }
    catch (ObjectDisposedException)
    {
        // ignore this as its thrown when the stream is stopped
    }
}
It is a good practice for software to notify the person using it that something is happening, outputting the . characters on a line might not be as flashy as a progress bar, however it notifies you that the program is running and capturing images.
~/Documents/dev/dotnetPiCam $ dotnet run
Capturing video, press any key to stop
....................................................
The try and catch blocks of code are used to help the software handle unexpected scenarios, called exceptions. When code does something unexpected an exception is thrown, sometimes by the code, sometimes by the .NET runtime. In code this exception can be 'caught' and handled in a way that does not stop the program running. In this case the 'exception' being caught is being ignored as it is a known issue that when the camera capture stream is stopped it can throw an ObjectDisposedException. The ObjectDisposedException means the code is attempting to use an object that has already been destroy, or disposed.
Saving a video file
Most of the code is now in place to save a video. In the list of supported PixelFormat types should be PixelFormat.H264, this is a video format. Changing the VideoConnectionSettings.PixelFormat to PixelFormat.H264 provides a video stream to the NewImageBufferReadyEventHandler method shown in the previous step.
Edit the code in the Program.cs file as follows.
using Iot.Device.Media;

VideoConnectionSettings settings = new VideoConnectionSettings(busId: 0, captureSize: (640, 480), pixelFormat: PixelFormat.H264);

using VideoDevice device = VideoDevice.Create(settings);

using FileStream fileStream = File.Create("/home/pi/Videos/capture.H264");

device.NewImageBufferReady += NewImageBufferReadyEventHandler;

device.StartCaptureContinuous();

CancellationTokenSource tokenSource = new CancellationTokenSource();

new Thread(() => { device.CaptureContinuous(tokenSource.Token); }).Start();

Console.WriteLine("Capturing video, press any key to stop");
while (!Console.KeyAvailable)
{
    Thread.SpinWait(1);
}

tokenSource.Cancel();
device.StopCaptureContinuous();

async void NewImageBufferReadyEventHandler(object sender, NewImageBufferReadyEventArgs e)
{
    try
    {
        await fileStream.WriteAsync(e.ImageBuffer, 0, e.Length);
        Console.Write(".");
    }
    catch (ObjectDisposedException)
    {
        // ignore this as its thrown when the stream is stopped
    }
}
Save the Program.cs file, and in the Terminal window, enter the
dotnet run command again to compile and run the application.
When this program is run in the terminal with dotnet run, the program starts capturing video and saving the video in the Videos folder. Again, do not leave this running for too long as it will fill up the storage with the video. Run for a few seconds and then click a key on the keyboard to stop the program.
In the /home/pi/Videos/ folder should be a file named capture.H264, this can played on a Raspberry Pi with an application like the VLC Media Player (which ships by default with most Raspbian distributions).
As mentioned above the settings used to create the VideoDevice have changed to use the PixelFormat.H264 format.
VideoConnectionSettings settings = new VideoConnectionSettings(busId: 0, captureSize: (640, 480), pixelFormat: PixelFormat.H264);
A file to store the video is created, and the returned FileStream instance stored in the fileStream variable. As with the VideoDevice the using keyword is at the start of the line. The using ensures any resources consumed by the FileStream are cleaned up when the program finishes.
NOTE: make sure on the Raspberry Pi the folder at this path /home/pi/Videos does exist. If not then change this path to a location of a folder that does exist to store the captured video.
using FileStream fileStream = File.Create("/home/pi/Videos/capture.H264");
In the NewImageBufferReadyEventHandler method the code saving the images has been replaced by code to write the ImageBuffer to the fileStream object. The ImageBuffer is a byte array containing the video from the camera encoded as H.264.
await fileStream.WriteAsync(e.ImageBuffer, 0, e.Length);
Conclusions
In this Note the IoT.Device.Bindings library has been used to capture images and video on a Raspberry Pi, with a camera kit attached. The IoT.Device.Bindings library provides a set of wrapper classes, and types, that make coding to support the camera, and other, devices simple. The System.Device.Gpio library is used by the IoT.Device.Bindings library to access the lower level protocols supported by many IoT devices.
This code was all written and tested on a Raspberry Pi 3 Model B Plus, attached to a Raspberry Pi camera kit.