Dr. Neil's Notes
Software > Coding
.NET Camera Server on Raspberry Pi
Introduction
In previous Notes I have documented how to get a Raspberry Pi setup to develop with .NET, a few simple console programs that Animate ASCII art, display a clock, and display the weather. Most recently how to use the camera on a Raspberry Pi from simple .NET code, and how to create a web server on a Raspberry Pi.
In this Note I explain how to combine the last two Notes to use .NET to create a simple server on a Raspberry Pi that displays the camera feed to other machines on your network. Before reading this Note, it is recommended you read the Notes on how to use the camera on a Raspberry Pi from simple .NET code, and how to create a web server on a Raspberry Pi.
The code shown in this Note may work on other IoT platforms supported by .NET 6, it has been tested on a Raspberry Pi.
If you want to get a Raspberry Pi setup to run .NET code, follow the instructions in the .NET Development on a Raspberry Pi Note.
This Note assumes you have installed .NET 6 and Visual Studio Code.
Create the project
If there is not already a folder for code projects, create a folder for code projects. I created a folder called dev.
Open a Terminal window on the Raspberry Pi, and navigate to the folder where you want to create the new folder (e.g. Documents), then enter
mkdir dev
This makes the directory dev
Navigate to that directory
cd dev
Create a directory for this project, named dotnetPiCamServer
mkdir dotnetPiCamServer
Change the directory to the new folder just created.
cd dotnetPiCamServer/
To create the .NET 6 ASP.NET Core Web API application use the command
dotnet new webapi
The default name of the new project is the name of the folder in which the project is being created.
The Terminal should look like this.
~/Documents/dev $ mkdir dotnetPiCamServer
~/Documents/dev $ cd dotnetPiCamServer/
~/Documents/dev/dotnetPiCamServer $ dotnet new webapi
The template "ASP.NET Core Web API" was created successfully.

Processing post-creation actions...
Running 'dotnet restore' on /home/pi/Documents/dev/dotnetPiCamServer/dotnetPiCamServer.csproj...
  Determining projects to restore...
  Restored /home/pi/Documents/dev/dotnetPiCamServer/dotnetPiCamServer.csproj (in 7.99 sec).
Restore succeeded.
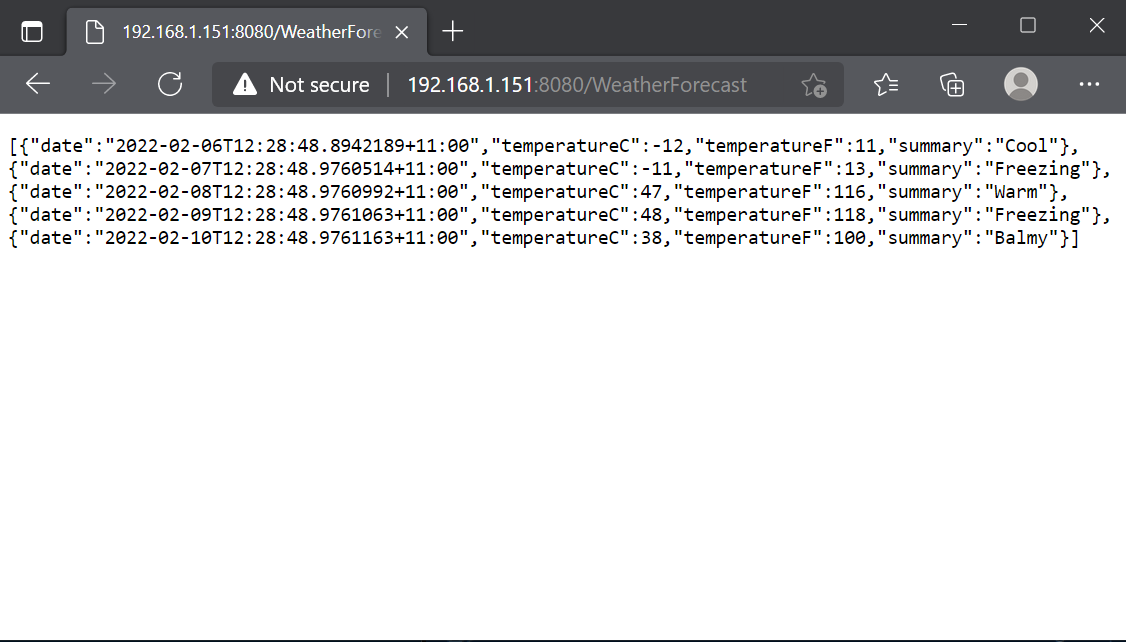
This creates a new web API app from a template that serves random weather data from a WeatherForecast endpoint.
Compile and run the new application from the Terminal window with dotnet run
The dotnet run command will compile the project code in the current folder and run it.
To run the application to support a specific IP address (or URL) enter the --urls parameter as below.
NOTE: this should be the IP address of your Raspberry Pi, check the Note on creating a web server on a Raspberry Pi for more information.
~/Documents/dev/dotnetPiCamServer $ dotnet run --urls=http://192.108.1.151:8080
Building...
info: Microsoft.Hosting.Lifetime[14]
      Now listening on: http://192.168.1.151:8080
info: Microsoft.Hosting.Lifetime[0]
      Application started. Press Ctrl+C to shut down.
info: Microsoft.Hosting.Lifetime[0]
      Hosting environment: Development
info: Microsoft.Hosting.Lifetime[0]
      Content root path: /home/pi/Documents/dev/dotnetPiCamServer/
Then on another computer, phone, or tablet that is on the same network as the Raspberry Pi, open a web browser window, and enter the address that was specified in the previous step, along with the WeatherForecast endpoint.
Return to the Terminal window where the dotnet run command was entered.
Press ctrl+c to stop running the program.
Remove the sample code
To make this code return a video feed from the Raspberry Pi camera, start by removing the fake WeatherForecast endpoint that was created as part of the dotnet new webapi template.
In the Terminal window used in the previous step, start Visual Studio Code with the code . command. This will open Visual Studio Code with the current folder on the Raspberry Pi desktop.
Delete the WeatherForecast.cs file in the root of the folder
Rename the WeatherForecastController.cs file to VideoController.cs
The files and folders in the dotnetPiCamServer folder should now look like this
~/Documents/dev/dotnetPiCamServer $ tree
.
├── appsettings.Development.json
├── appsettings.json
├── Camera.cs
├── Controllers
│   └── VideoController.cs
├── dotnetPiCamServer.csproj
├── Program.cs
└── Properties
    └── launchSettings.json
In Visual Studio Code edit the contents of the renamed VideoController.cs file to return a blank Video page as follows
using Microsoft.AspNetCore.Mvc;
namespace dotnetPiCamServer.Controllers;

[ApiController]
[Route("[controller]")]
public class VideoController : ControllerBase
{
    private readonly ILogger<WeatherForecastController> _logger;

    public VideoController(ILogger<VideoController> logger)
    {
        _logger = logger;
    }

    [HttpGet(Name = "GetVideo")]
    public void Get()
    {

    }
}
Run the application to support the IP address (or URL) of the Raspberry Pi, using the --urls parameter as shown below.
NOTE: this should be the IP address of your Raspberry Pi, check the Note on creating a web server on a Raspberry Pi for more information.
~/Documents/dev/dotnetPiCamServer $ dotnet run --urls=http://192.168.1.151:8080
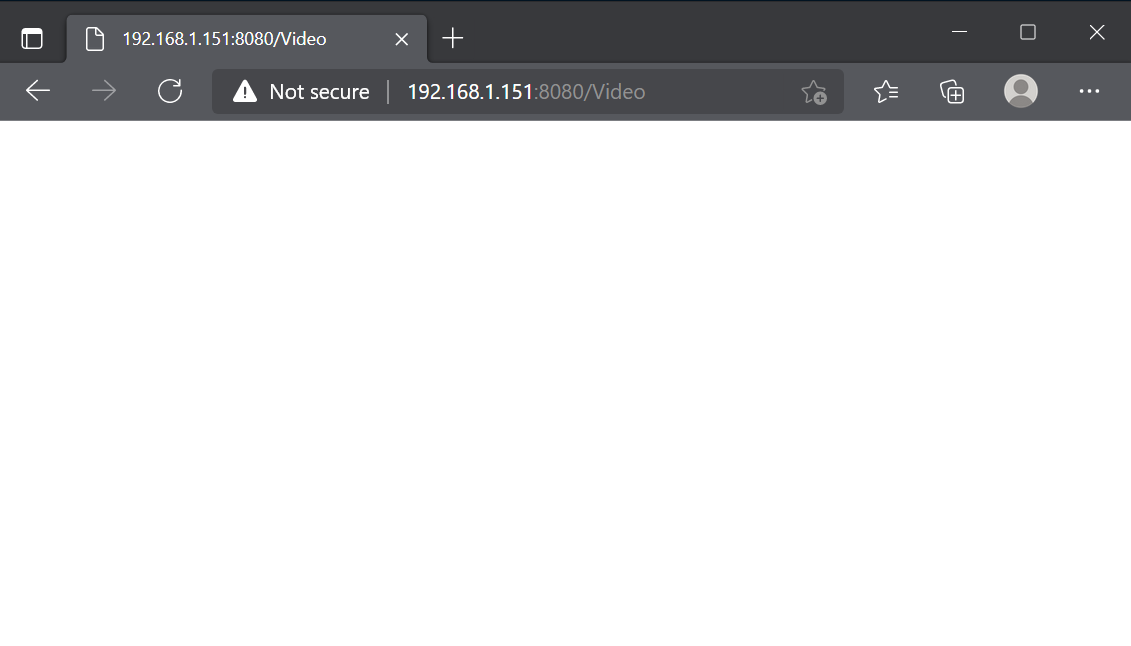
Then on another computer, phone, or tablet that is on the same network as the Raspberry Pi, open a web browser window, and enter the address that was specified in the previous step, along with the Video endpoint.
The weather information should be gone and a blank page returned.
Return to the Terminal window where the dotnet run command was entered.
Press ctrl+c to stop running the program.
Add the IoT packages
In visual Studio Code, open the project file dotnetPiCamServer.csproj. Edit the project file to include references to the IoT packages. Two packages need to be entered, the same packages that were added in the Note on using the camera on a Raspberry Pi from simple .NET code
<PackageReference Include="System.Device.Gpio" Version="2.0.0" />
<PackageReference Include="Iot.Device.Bindings" Version="2.0.0" />
The complete project file should like like this
<Project Sdk="Microsoft.NET.Sdk.Web">

  <PropertyGroup>
    <TargetFramework>net6.0</TargetFramework>
    <Nullable>enable</Nullable>
    <ImplicitUsings>enable</ImplicitUsings>
  </PropertyGroup>

  <ItemGroup>
    <PackageReference Include="Swashbuckle.AspNetCore" Version="6.2.3" />
    <PackageReference Include="System.Device.Gpio" Version="2.0.0" />
    <PackageReference Include="Iot.Device.Bindings" Version="2.0.0" />
  </ItemGroup>

</Project>
Create a Camera class
In the same folder that contains the Program.cs file and the dotnetPiCamServer.csproj file, add a new file named Camera.cs.
In Visual Studio Code open the Camera.cs file to add the code to access the camera. If you followed the Note on using the camera on a Raspberry Pi from simple .NET code, then this code should look familiar to you.
using Iot.Device.Media;

public class Camera
{
    VideoConnectionSettings settings;
    VideoDevice device;
    CancellationTokenSource tokenSource = new CancellationTokenSource();

    public event VideoDevice.NewImageBufferReadyEvent NewImageReady
    {
        add { device.NewImageBufferReady += value; }
        remove { device.NewImageBufferReady -= value; }
    }

    public Camera()
    {
        settings = new VideoConnectionSettings(
            busId: 0,
            captureSize: (640, 480),
            pixelFormat: PixelFormat.JPEG
        );
        device = VideoDevice.Create(settings);
        device.ImageBufferPoolingEnabled = true;
    }

    public void StartCapture()
    {
        if (!device.IsOpen)
        {
            device.StartCaptureContinuous();
        }

        if (!device.IsCapturing)
        {
            new Thread(() =>
                {
                    device.CaptureContinuous(tokenSource.Token);
                }
            ).Start();
        }
    }

    public void StopCapture()
    {
        if (device.IsCapturing)
        {
            tokenSource.Cancel();
            tokenSource = new CancellationTokenSource();
            device.StopCaptureContinuous();
        }
    }
}
This Camera class encapsulates the code required to interact with the camera attached to the Raspberry Pi.
The event is defined to enable other code to receive notifications when a frame from the camera becomes available to render.
public event VideoDevice.NewImageBufferReadyEvent NewImageReady
{
    add { device.NewImageBufferReady += value; }
    remove { device.NewImageBufferReady -= value; }
}
The constructor is the method used to create an instance of this class that can by used by other code to control the camera.
A constructor does not return any type, as it creates an instance of the class, as an object.
For the camera class, the constructor initializes the settings to use when working with the camera. Then an instance of a VideoDevice is created with the settings defined. Setting the ImageBufferPoolingEnabled enables the VideoDevice to create a pool (or collection) of images buffers that can be reused. This helps with performance as memory does not need to be allocated for each new frame being captured by the camera.
public Camera()
{
    settings = new VideoConnectionSettings(
        busId: 0,
        captureSize: (640, 480),
        pixelFormat: PixelFormat.H264
    );
    device = VideoDevice.Create(settings);
    device.ImageBufferPoolingEnabled = true;
}
The StartCapture() and StartCapture() methods do what you would expect from the method names. The StartCapture method sets the VideoDevice to start continuous capture, and then creates a thread (code that will run on it's own until cancelled or finished) to keep capturing frames. The CancellationTokenSource passed to the CaptureContinuous method in the thread can be used in the StopCapture method to stop the continuous capture of frames, and end the thread.
Instantiate a single instance of the Camera class
For this project only a single instance of the camera class is needed for the web server to serve the frames from the camera. In this ASP.NET Core web application the Camera class can be created as a singleton using the line
builder.Services.AddSingleton<Camera>();
This creates the Camera as a singleton instance that can be obtained by an endpoint.
The program.cs file should now look like this:
var builder = WebApplication.CreateBuilder(args);

// Add services to the container.
builder.Services.AddControllers();
// Learn more about configuring Swagger/OpenAPI at https://aka.ms/aspnetcore/swashbuckle
builder.Services.AddEndpointsApiExplorer();
builder.Services.AddSwaggerGen();

builder.Services.AddSingleton<Camera>();

var app = builder.Build();

// Configure the HTTP request pipeline.
if (app.Environment.IsDevelopment())
{
    app.UseSwagger();
    app.UseSwaggerUI();
}
app.UseHttpsRedirection();
app.UseAuthorization();
app.MapControllers();

app.Run();
Stream the Camera Frames
In Visual Studio Code edit the VideoController.cs file to use the camera stream to show image frames in the response returned from the Video endpoint.
The code should look like this:
using Microsoft.AspNetCore.Mvc;
using Iot.Device.Media;
using Microsoft.AspNetCore.Http.Features;
using System.Buffers;
using System.Text;

namespace dotnetPiCamServer.Controllers;

[ApiController]
[Route("[controller]")]
public class VideoController : ControllerBase
{
    private readonly ILogger<VideoController> _logger;
    private readonly Camera _camera;

    public VideoController(ILogger<VideoController> logger, Camera camera)
    {
        _logger = logger;
        _camera = camera;
    }

    [HttpGet(Name = "GetVideo")]
    public void Get()
    {
        var bufferingFeature =
            HttpContext.Response.HttpContext.Features.Get<IHttpResponseBodyFeature>();
        bufferingFeature?.DisableBuffering();

        HttpContext.Response.StatusCode = 200;
        HttpContext.Response.ContentType = "multipart/x-mixed-replace; boundary=--frame";
        HttpContext.Response.Headers.Add("Connection", "Keep-Alive");
        HttpContext.Response.Headers.Add("CacheControl", "no-cache");
        _camera.NewImageReady += WriteFrame;

        try
        {
            _logger.LogWarning($"Start streaming video");
            _camera.StartCapture();

            while (!HttpContext.RequestAborted.IsCancellationRequested) { }
        }
        catch (Exception ex)
        {
            _logger.LogError($"Exception in streaming: {ex}");
        }
        finally
        {
            HttpContext.Response.Body.Close();
            _logger.LogInformation("Stop streaming video");
        }

        _camera.NewImageReady -= WriteFrame;
        _camera.StopCapture();
    }

    private async void WriteFrame(object sender, NewImageBufferReadyEventArgs e)
    {
        try
        {
            await HttpContext.Response.BodyWriter.WriteAsync(CreateHeader(e.Length));
            await HttpContext.Response.BodyWriter.WriteAsync(
                e.ImageBuffer.AsMemory().Slice(0, e.Length)
            );
            await HttpContext.Response.BodyWriter.WriteAsync(CreateFooter());
        }
        catch (ObjectDisposedException)
        {
            // ignore this as its thrown when the stream is stopped
        }

        ArrayPool<byte>.Shared.Return(e.ImageBuffer);
    }

    private byte[] CreateHeader(int length)
    {
        string header =
            $"--frame\r\nContent-Type:image/jpeg\r\nContent-Length:{length}\r\n\r\n";
        return Encoding.ASCII.GetBytes(header);
    }

    private byte[] CreateFooter()
    {
        return Encoding.ASCII.GetBytes("\r\n");
    }
}
The constructor of the VideoController class now has a parameter for the Camera object. This camera is provided by the ASP.NET Core runtime, because in the previous step the Camera was defined a singleton added to the available Services.
A local readonly variable is set to reference the Camera object.
private readonly Camera _camera;

public VideoController(ILogger<VideoController> logger, Camera camera)
{
    _logger = logger;
    _camera = camera;
}
The Get method that is called when the 'Video` endpoint is being retrieved does the work of creating the http response to the request.
The properties set on the HttpContext.Response provide information about the response. StatusCode 200 is used to indicate success. The ContentType is defined to notify the receiver (a web browser) of the format to expect in the response. The Headers provide information about the connection and content that helps the receiver determine if they should cache the result (no), and drop the connection (no again), when the response is received.
The NewImageReady event on the camera is set to be handled by the WriteFrame method.
The try code block calls the StartCapture method on the camera, and then starts a loop doing nothing until the current HttpContext requests a cancellation. In the Note on how to use the camera on a Raspberry Pi from simple .NET code a loop was created to capture frames until a key was pressed, this replaces that code.
The catch code block will output to the log that something went wrong when capturing the frames in the video stream.
A finally code block is always called even when an exception is caught in the catch block. The code in this finally block ends the video stream by closing the connection to the endpoint.
Once all the action has happened the handler for the new frames can be removed, and the camera told to stop capturing video input.
[HttpGet(Name = "GetVideo")]
public void Get()
{
    var bufferingFeature =
        HttpContext.Response.HttpContext.Features.Get<IHttpResponseBodyFeature>();
    bufferingFeature?.DisableBuffering();

    HttpContext.Response.StatusCode = 200;
    HttpContext.Response.ContentType = "multipart/x-mixed-replace; boundary=--frame";
    HttpContext.Response.Headers.Add("Connection", "Keep-Alive");
    HttpContext.Response.Headers.Add("CacheControl", "no-cache");
    _camera.NewImageReady += WriteFrame;

    try
    {
        _logger.LogWarning($"Start streaming video");
        _camera.StartCapture();

        while (!HttpContext.RequestAborted.IsCancellationRequested) { }
    }
    catch (Exception ex)
    {
        _logger.LogError($"Exception in streaming: {ex}");
    }
    finally
    {
        HttpContext.Response.Body.Close();
        _logger.LogInformation("Stop streaming video");
    }

    _camera.NewImageReady -= WriteFrame;
    _camera.StopCapture();
}
The WriteFrame method outputs information about the frame and the frame bytes to the response. The CreateHeader method builds the header string containing the length of the image frame (in bytes). Then the ImageBuffer from the camera is written to the response. Then a 'footer' is added to make clear this is the end of the frame, this Encoding.ASCII.GetBytes("\r\n"); sends a return (\r) and new line (\n) after each frame.
NOTE: the ImageBuffer is returned to the ArrayPool of memory to be used again by another future frame. This is how the setting device.ImageBufferPoolingEnabled = true in the camera is used to reduce the amount of memory created and released during the lifetime of the application.
private async void WriteFrame(object sender, NewImageBufferReadyEventArgs e)
{
    try
    {
        await HttpContext.Response.BodyWriter.WriteAsync(CreateHeader(e.Length));
        await HttpContext.Response.BodyWriter.WriteAsync(
            e.ImageBuffer.AsMemory().Slice(0, e.Length)
        );
        await HttpContext.Response.BodyWriter.WriteAsync(CreateFooter());
    }
    catch (ObjectDisposedException)
    {
        // ignore this as its thrown when the stream is stopped
    }

    ArrayPool<byte>.Shared.Return(e.ImageBuffer);
}

private byte[] CreateHeader(int length)
{
    string header =
        $"--frame\r\nContent-Type:image/jpeg\r\nContent-Length:{length}\r\n\r\n";
    return Encoding.ASCII.GetBytes(header);
}

private byte[] CreateFooter()
{
    return Encoding.ASCII.GetBytes("\r\n");
}
Run the application to support the IP address (or URL) of the Raspberry Pi, using the --urls parameter as below.
NOTE: this should be the IP address of your Raspberry Pi, check the Note on creating a web server on a Raspberry Pi for more information.
~/Documents/dev/dotnetPiCamServer $ dotnet run --urls=http://192.168.1.151:8080
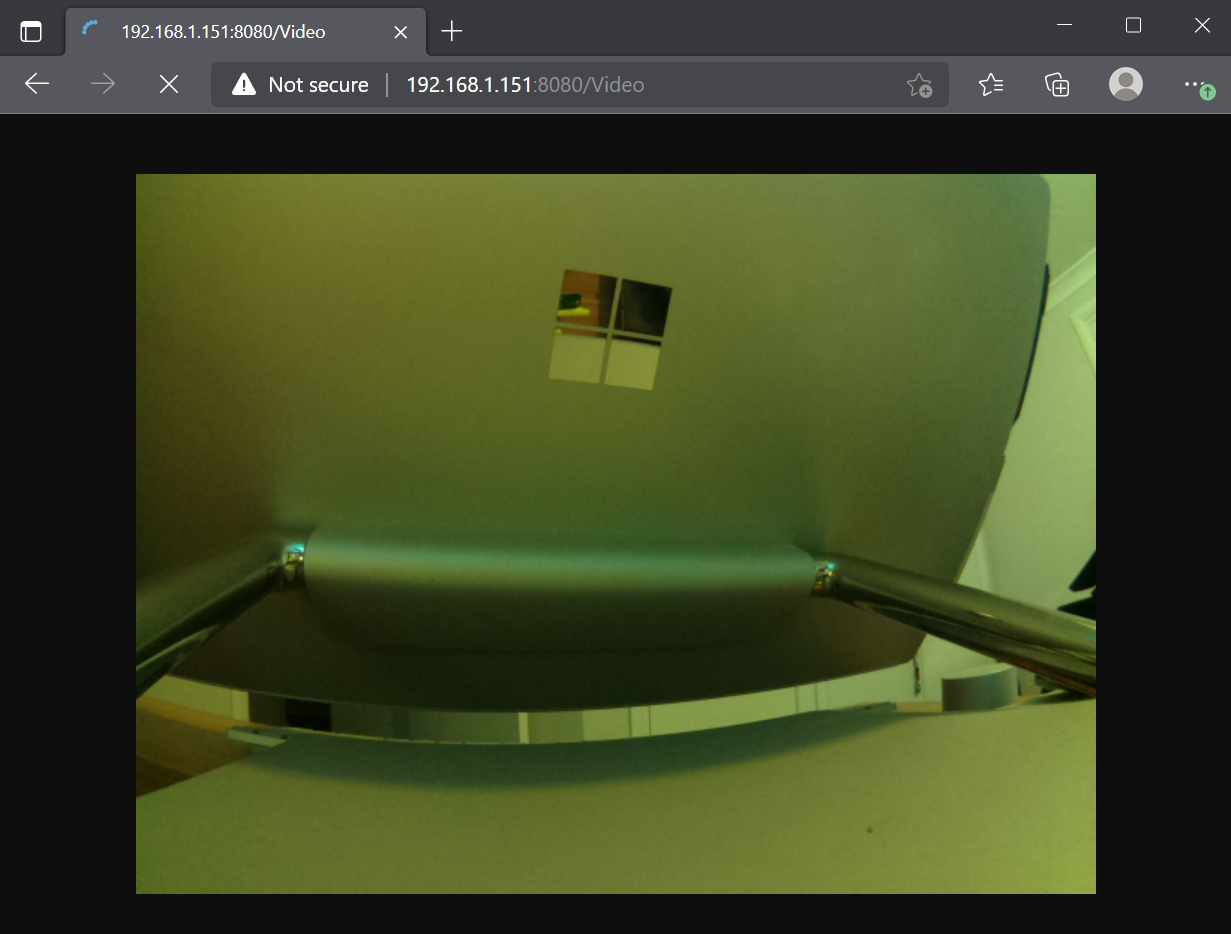
Then on another computer, phone, or tablet that is on the same network as the Raspberry Pi, open a web browser window, and enter the address that was specified in the previous step, along with the Video endpoint.
The video from the Raspberry Pi should now be streamed to the web page. (Shown here viewing the back of my desktop computer)
Return to the Terminal window where the dotnet run command was entered.
Press ctrl+c to stop running the program.
Conclusions
In this Note the knowledge of how to capture video from a Raspberry Pi has been combined with knowledge of creating a web application served from a Raspberry Pi. The end result is the Raspberry Pi is now able to server a stream of image frames from the camera, to a webpage displayed on other machines on the same network.
It should be noted that this is very much a toy at the moment. There is not security to protect against anyone else viewing the camera feed.