Dr. Neil's Notes
Software > Coding
.NET Console Clock
Introduction
Following on from the .NET Console Animations exercise, I thought it would be fun to create a clock using .NET in the console. This exercise uses some of the ideas from the Console Animation. If you are new to C# or .NET, step back through the .NET Console Animations notes.
This exercise has been done on a Raspberry Pi, if you want to learn how to set up your Raspberry Pi for .NET development read my notes on .NET Development on a Raspberry Pi.
Any operating system that supports .NET 6 can be used to do create the console clock, including Microsoft Windows, Apple OSX, and Linux.
A video that accompanies this Note can be found here
Creating a new .NET project
If you do not already have a folder to keep your code, start by creating a folder for your code projects. I created a folder called dev.
Open a Terminal session and navigate to where you want to create your folder (eg Documents) and enter
mkdir dev
This makes the directory dev
navigate to that directory
cd dev
then open Visual Studio Code. Note the 'dot' after the code, this tells Visual Studio Code to open the current folder.
code .
Your terminal entries should look something like this:
~ $ cd Documents/
~/Documents $ mkdir dev
~/Documents $ cd dev/
~/Documents/dev $ code .
~/Documents/dev $
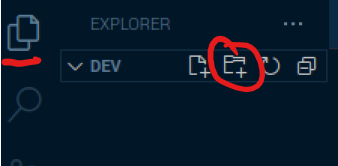
In Visual Studio Code create a new folder in your dev folder, call it ConsoleClock
Make sure you have the Explorer open (Ctrl+Shift+E), then click the New Folder icon, and name the new folder ConsoleClock
Open the Terminal window in Visual Studio Code, you can use the menu to select Terminal - New Terminal or press Ctrl+Shift+`
The Terminal will open along the bottom of your Visual Studio Code window and it will open in the folder you have opened with Visual Studio Code. In this case it will be your dev folder.
Change the directory to the new folder you just created.
cd ConsoleClock/
To create the .NET 6 console application use the command
dotnet new console
The default name of the new project is the name of the folder you are creating the project in.
The output should look like this.
The template "Console App" was created successfully.

Processing post-creation actions...
Running 'dotnet restore' on /home/pi/Documents/dev/ConsoleClock/ConsoleClock.csproj...
  Determining projects to restore...
  Restored /home/pi/Documents/dev/ConsoleClock/ConsoleClock.csproj (in 340 ms).
Restore succeeded.
You should also notice that files have been created in the Explorer view of Visual Studio Code.
You can run the new application from the Terminal window in Visual Studio Code with
dotnet run
This dotnet run command will compile the project code in the current folder and run it.
~/Documents/dev/ConsoleClock $ dotnet run
Hello, World!
As you can see it does not do much yet, other than output Hello, World!
Drawing Digits
At the end of the .NET Console Animations exercise each frame of the animation was defined by an array of strings, one string for each row of the ASCII art frame. The digits of the clock will need to be drawn on the console, however for the clock it would be good to use solid digits, rather than ASCII art. Each digit will be represented by an array of bytes, each byte will represent a row in the digit. In a byte are eight bits, with each bit being either 0 or 1. In C# a byte with no bits set to 1 can be represented as 0b00000000, a byte with all the bits set to 1 is represented as 0b11111111. To draw a digit on the clock using an array of bytes, each of the bits will indicate if a block of the digit should be drawn on the screen.
In Visual Studio Code, open the Program.cs file that was created with the ConsoleClock project. You should see the file in the Visual Studio Code explorer. Click on the file to open it.
It has one line of code above which is a comment.
Console.WriteLine("Hello, World!");
Delete both lines, to leave you with an empty file.
Enter the following code into the file
    byte[] One = new byte[]{
        0b00011000,
        0b00011000,
        0b00011000,
        0b00011000,
        0b00011000,
        0b00011000,
        0b00011000,
    };

    byte[] Two = new byte[]{
        0b11111111,
        0b00000011,
        0b00000011,
        0b11111111,
        0b11000000,
        0b11000000,
        0b11111111,
    };

    byte[] Three = new byte[]{
        0b11111111,
        0b00000011,
        0b00000011,
        0b01111111,
        0b00000011,
        0b00000011,
        0b11111111,
    };

    int clockTop = 5;
    int clockLeft = 5;
    int digitWidth = 10;
    ConsoleColor clockcolor = ConsoleColor.Green;
    int position = clockLeft;

    Console.Clear();

    DrawDigit(One, position, clockTop, clockcolor);
    position += digitWidth;
    DrawDigit(Two, position, clockTop, clockcolor);
    position += digitWidth;
    DrawDigit(Three, position, clockTop, clockcolor);

    Console.ResetColor();
    Console.WriteLine();
    Console.WriteLine("Finished drawing");

    void DrawDigit(byte[] digit, int X, int Y, ConsoleColor color)
    {
        foreach(byte row in digit)
        {
            for(int bitPosition = 0; bitPosition < 8; bitPosition++)
            {
                var mark = (row & (1<<bitPosition)) != 0;
                if (mark)
                {
                    Draw(X+8-bitPosition, Y, color);
                }
            }
            Y++;
        }
    }

    static void Draw(int X, int Y, ConsoleColor Color)
    {
        Console.SetCursorPosition(X, Y);
        Console.BackgroundColor = Color;
        Console.Write(" ");
    }
In the Terminal window enter the dotnet run command to compile and run the application.
When the program runs, it will display the three digits 1, 2, and 3.
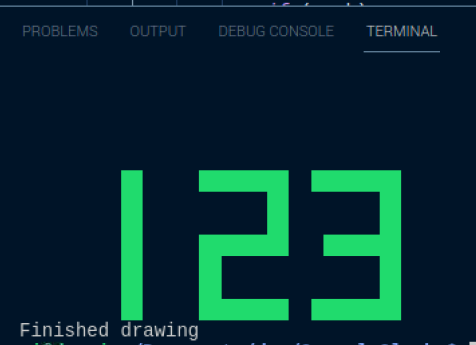
Let's break down what this code is doing.
At the top of the code three sets of byte arrays are defined to represent the numbers 1, 2, and 3. The 1's represent the blocks to be be displayed, the 0's represent the blank spaces.
The code then sets up some variables to define the position of the clock, the width of each digit, and the color of the clock digits.
The poaition variable is used to track the position to draw the next digit. Then the console is cleared, to provide the space to draw the digits.
int clockTop = 5;
int clockLeft = 5;
int digitWidth = 10;
ConsoleColor clockcolor = ConsoleColor.Green;

int position = clockLeft;
Console.Clear();
Each of the three digits is then drawn at a position, with a color.
Note that the position is incremented by the width of the digit after each digit is drawn.
DrawDigit(One, position, clockTop, clockcolor);
position += digitWidth;
DrawDigit(Two, position, clockTop, clockcolor);
position += digitWidth;
DrawDigit(Three, position, clockTop, clockcolor);
After the digits are drawn, the console colors are reset, and text is output to indicate the program has finished.
Console.ResetColor();
Console.WriteLine();
Console.WriteLine("Finished drawing");
There are two methods defined in this code DrawDigit and Draw.
The Draw method takes three parameters, the X and Y coordinates to draw at, and the color to draw. The code in the method sets the cursor position in the console (or terminal), then changes the background color in the terminal to the drawing color and draws a space character, forcing the background at that point to paint the selected color.
static void Draw(int X, int Y, ConsoleColor color)
{
    Console.SetCursorPosition(X, Y);
    Console.BackgroundColor = color;
    Console.Write(" ");
}
The DrawDigit method calls the Draw method to draw each part of the digit. A digit is represented by a collection (array) of bytes, each byte represents a row of the digit. The bits in each byte indicate if the position of that bit should be drawn.
The method takes four parameters
- digit ; the byte array representing the digit
- X ; the horizontal (x) coordinate to draw the digit
- Y ; the vertical (y) coordinate to draw the digit
- color ; the color to draw the digit.
The code in the method iterates through each of the bytes in the digit array, each byte represents a row.
For each of the rows, each bit on that row is isolated to determine if it is 'set', or equal to '1'.
If the bit is 1 then the block is drawn at the specified point.
The vertical offset of the next row is then incremented with Y++.
void DrawDigit(byte[] digit, int X, int Y, ConsoleColor color)
{
    foreach(byte row in digit)
    {
        for(int bitPosition = 0; bitPosition < 8; bitPosition++)
        {
            var mark = (row & (1<<bitPosition)) != 0;
            if (mark)
            {
                Draw(X+8-bitPosition, Y, color);
            }
        }
        Y++;
    }
}
This line of code might be the hardest to understand
var mark = (row & (1<<bitPosition)) != 0;
The row is the byte, the & operator performs a bitwise AND operation on the row and 1, left bit shifted by the position of the bit. If the result of the AND is not 0 then that bit needs to be drawn.
The << operator is a left shift operator, this performs a bitwise shift by the bitPosition of the number 1.
Consider the number one represented in binary as 00000001. Left shifting this bit by 1 position would return the binary pattern 00000010. The 1 has been shifted to the left. Performing this 8 times allows every bit in a byte to be tested.
The Draw method is called to draw the block at the X+8-bitPosition because the byte array is being checked from right to left, meaning the character for hte digit is drawn from the right to left.
This could be modified to draw from left to right by shifting right from 128 as shown in the code below. The number 128 is represented in binary as 10000000, so shifting the 1 bit right 8 times, would test the bits from left to right, allowing the Draw method to be called with the X position of the digit plus the bitPosition.
for(int bitPosition = 0; bitPosition < 8; bitPosition++)
{
    var mark = (row & (128>>bitPosition)) != 0;
    if (mark)
    {
        Draw(X+bitPosition, Y, color);
    }
}
Using 128 and right shifting is perhaps less intuitive than using 1 and left shifting.
Drawing a Clock
With numbers being drawn on the screen it should be a simple step to draw the digits of a clock. A digital clock is a series of four digits, and to be extra cool, display a couple of flashing dots between the hour and minute digits. Define the other digits and the dots character as follows.
byte[] Zero = new byte[]{
    0b11111111,
    0b11000011,
    0b11000011,
    0b11000011,
    0b11000011,
    0b11000011,
    0b11111111,
};

byte[] One = new byte[]{
    0b00011000,
    0b00011000,
    0b00011000,
    0b00011000,
    0b00011000,
    0b00011000,
    0b00011000,
};

byte[] Two = new byte[]{
    0b11111111,
    0b00000011,
    0b00000011,
    0b11111111,
    0b11000000,
    0b11000000,
    0b11111111,
};

byte[] Three = new byte[]{
    0b11111111,
    0b00000011,
    0b00000011,
    0b01111111,
    0b00000011,
    0b00000011,
    0b11111111,
};

byte[] Four = new byte[]{
    0b11000011,
    0b11000011,
    0b11000011,
    0b11111111,
    0b00000011,
    0b00000011,
    0b00000011,
};

byte[] Five = new byte[]{
    0b11111111,
    0b11000000,
    0b11000000,
    0b11111111,
    0b00000011,
    0b00000011,
    0b11111111,
};

byte[] Six = new byte[]{
    0b11111110,
    0b11000000,
    0b11000000,
    0b11111111,
    0b11000011,
    0b11000011,
    0b11111111,
};

byte[] Seven = new byte[]{
    0b11111111,
    0b00000011,
    0b00000011,
    0b00000011,
    0b00000011,
    0b00000011,
    0b00000011,
};

byte[] Eight = new byte[]{
    0b11111111,
    0b11000011,
    0b11000011,
    0b11111111,
    0b11000011,
    0b11000011,
    0b11111111,
};

byte[] Nine = new byte[]{
    0b11111111,
    0b11000011,
    0b11000011,
    0b11111111,
    0b00000011,
    0b00000011,
    0b01111111,
};

byte[] Dots = new byte[]{
    0b00000000,
    0b00000000,
    0b00011000,
    0b00000000,
    0b00011000,
    0b00000000,
    0b00000000,
};

byte[][] digitArray = new byte[][]{Zero, One, Two, Three, Four, Five, Six, Seven, Eight, Nine};

int clockTop = 5;
int clockLeft = 5;
int digitWidth = 10;
ConsoleColor clockcolor = ConsoleColor.Green;
int position = clockLeft;

Console.Clear();

DisplayDigits("12");
DrawDigit(Dots, position, clockTop, clockcolor);
position += digitWidth;
DisplayDigits("34");

Console.ResetColor();
Console.WriteLine();
Console.WriteLine("Finished drawing");

void DisplayDigits(string digits)
{
    foreach (var c in digits)
    {
        int n = int.Parse($"{c}");
        DrawDigit(digitArray[n], position, clockTop, clockcolor);
        position += digitWidth;
    }
}

void DrawDigit(byte[] digit, int X, int Y, ConsoleColor color)
{
    foreach (byte row in digit)
    {
        for (int bitPosition = 0; bitPosition < 8; bitPosition++)
        {
            var mark = (row & (128 >> bitPosition)) != 0;
            if (mark)
            {
                Draw(X + bitPosition, Y, color);
            }
        }
        Y++;
    }
}

static void Draw(int X, int Y, ConsoleColor Color)
{
    Console.SetCursorPosition(X, Y);
    Console.BackgroundColor = Color;
    Console.Write(" ");
}
Each of the digits are defined as a collection of bytes, then placed into an array named digitArray. The digitArray contains each digit at the offset of the number it represents. For example digitArray[0] contains the 0 digit byte array, and digitArray[9] contains the 9 digit byte array.
The DisplayDigits method takes a string and iterates through each character, converting it into an int named n. This is then used as the offset to the digitArray. This method does assume that the characters in the string are numbers that can be parsed as an int.
void DisplayDigits(string digits)
{
    foreach (var c in digits)
    {
        int n = int.Parse($"{c}");
        DrawDigit(digitArray[n], position, clockTop, clockcolor);
        position += digitWidth;
    }
}
Then the code that displays the digits can call the DisplayDigits method with a string of numbers. Notice that the Dots are not a number so need to be output using the array directly with DrawDigit(Dots, position, clockTop, clockcolor);.
DisplayDigits("12");
DrawDigit(Dots, position, clockTop, clockcolor);
position += digitWidth;
DisplayDigits("34");
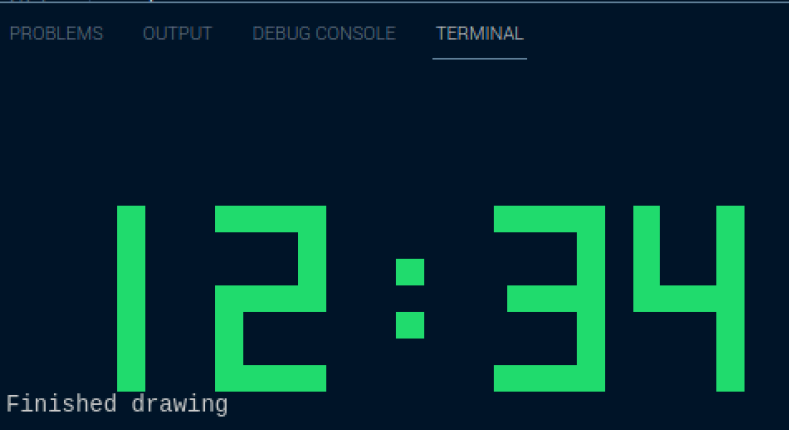
In the Terminal window enter the dotnet run command again, to compile and run the application.
When the program runs, it will display the out 12:34
Getting the Time
All the code is now in place to get the time and display it. In the Console Animation a while loop was used to run the animation until, a key was pressed. The same code will be used here to update the clock every second, until a key is pressed. The code to display the digits is replaced with the while loop shown below.
The time is retrieved with DateTime time = DateTime.Now;. The hour can be retrieved from the time as a string, with leading zeros; string hour = time.Hour.ToString().PadLeft(2, '0');. The minute is retrieved in a similar way string minute = time.Minute.ToString().PadLeft(2, '0');.
With a string of digits, the DisplayDigits method, from the previous step, is used to display the time.
bool displayDots = false;
Console.CursorVisible = false;

while (Console.KeyAvailable is false)
{
    Console.Clear();
    position = clockLeft;
    DateTime time = DateTime.Now;

    string hour = time.Hour.ToString().PadLeft(2, '0');
    DisplayDigits(hour);

    if (displayDots)
    {
        DrawDigit(Dots, position, clockTop, clockcolor);
    }
    displayDots = !displayDots;
    position += digitWidth;

    string minute = time.Minute.ToString().PadLeft(2, '0');
    DisplayDigits(minute);

    Console.ResetColor();
    await Task.Delay(1000);
}
Console.CursorVisible = true;
The displayDots flag is used to determine if the the dots in the centre of the digits should be shown. This is alternated, between true and false, each time the code runs through the loop. This flashes the dots on and off.
At the end of each loop the task is delayed for 1000 milliseconds (or 1 second), before running the loop again.
if (displayDots)
{
    DrawDigit(Dots, position, clockTop, clockcolor);
}
displayDots = !displayDots;
Conclusions
The steps presented in this note extend from the Console Animations to display and update a clock in the console. This code can be used on any platform that supports .NET 6. While I did most of the development on a Raspberry Pi, you can do this on Windows OSX, or Linux.
The complete code listing for the console clock is below.
byte[] Zero = new byte[]
{
    0b11111111,
    0b11000011,
    0b11000011,
    0b11000011,
    0b11000011,
    0b11000011,
    0b11111111,
};

byte[] One = new byte[]
{
    0b00011000,
    0b00011000,
    0b00011000,
    0b00011000,
    0b00011000,
    0b00011000,
    0b00011000,
};

byte[] Two = new byte[]
{
    0b11111111,
    0b00000011,
    0b00000011,
    0b11111111,
    0b11000000,
    0b11000000,
    0b11111111,
};

byte[] Three = new byte[]
{
    0b11111111,
    0b00000011,
    0b00000011,
    0b01111111,
    0b00000011,
    0b00000011,
    0b11111111,
};

byte[] Four = new byte[]
{
    0b11000011,
    0b11000011,
    0b11000011,
    0b11111111,
    0b00000011,
    0b00000011,
    0b00000011,
};

byte[] Five = new byte[]
{
    0b11111111,
    0b11000000,
    0b11000000,
    0b11111111,
    0b00000011,
    0b00000011,
    0b11111111,
};

byte[] Six = new byte[]
{
    0b11111110,
    0b11000000,
    0b11000000,
    0b11111111,
    0b11000011,
    0b11000011,
    0b11111111,
};

byte[] Seven = new byte[]
{
    0b11111111,
    0b00000011,
    0b00000011,
    0b00000011,
    0b00000011,
    0b00000011,
    0b00000011,
};

byte[] Eight = new byte[]
{
    0b11111111,
    0b11000011,
    0b11000011,
    0b11111111,
    0b11000011,
    0b11000011,
    0b11111111,
};

byte[] Nine = new byte[]
{
    0b11111111,
    0b11000011,
    0b11000011,
    0b11111111,
    0b00000011,
    0b00000011,
    0b01111111,
};

byte[] Dots = new byte[]
{
    0b00000000,
    0b00000000,
    0b00011000,
    0b00000000,
    0b00011000,
    0b00000000,
    0b00000000,
};

byte[][] digitArray = new byte[][]{ Zero,One,Two,Three,Four,Five,Six,Seven,Eight,Nine };

int clockTop = 5;
int clockLeft = 5;
int digitWidth = 10;
ConsoleColor clockcolor = ConsoleColor.Green;
int position;

bool displayDots = false;
Console.CursorVisible = false;

while (Console.KeyAvailable is false)
{
    Console.Clear();
    position = clockLeft;
    DateTime time = DateTime.Now;

    string hour = time.Hour.ToString().PadLeft(2, '0');
    DisplayDigits(hour);

    if (displayDots)
    {
        DrawDigit(Dots, position, clockTop, clockcolor);
    }
    displayDots = !displayDots;
    position += digitWidth;

    string minute = time.Minute.ToString().PadLeft(2, '0');
    DisplayDigits(minute);

    Console.ResetColor();
    await Task.Delay(1000);
}
Console.CursorVisible = true;

Console.WriteLine();
Console.WriteLine("Finished drawing");

void DisplayDigits(string digits)
{
    foreach (var c in digits)
    {
        int n = int.Parse($"{c}");
        DrawDigit(digitArray[n], position, clockTop, clockcolor);
        position += digitWidth;
    }
}

void DrawDigit(byte[] digit, int X, int Y, ConsoleColor color)
{
    foreach (byte row in digit)
    {
        for (int bitPosition = 0; bitPosition < 8; bitPosition++)
        {
            var mark = (row & (128 >> bitPosition)) != 0;
            if (mark)
            {
                Draw(X + bitPosition, Y, color);
            }
        }
        Y++;
    }
}

static void Draw(int X, int Y, ConsoleColor Color)
{
    Console.SetCursorPosition(X, Y);
    Console.BackgroundColor = Color;
    Console.Write(" ");
}