Dr. Neil's Notes
Software > Coding
Building a Glowbit Server
Introduction
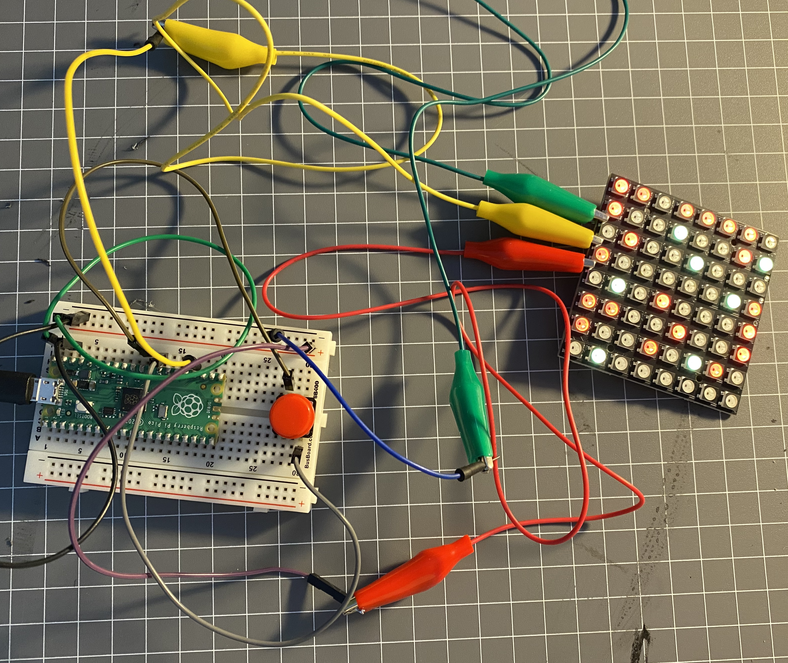
The Glowbit product from Core Electronics is an array of LEDs setup for easy programming using a micro-controller development board. In this project I used five Glowbit Matrix 8 x 8 modules and a Raspberry Pi Pico W. Connecting the Glowbit modules in a 5 x 1 array created a rectangular display. Connecting the Raspberry Pi Pico allowed for wireless control.
The Hardware
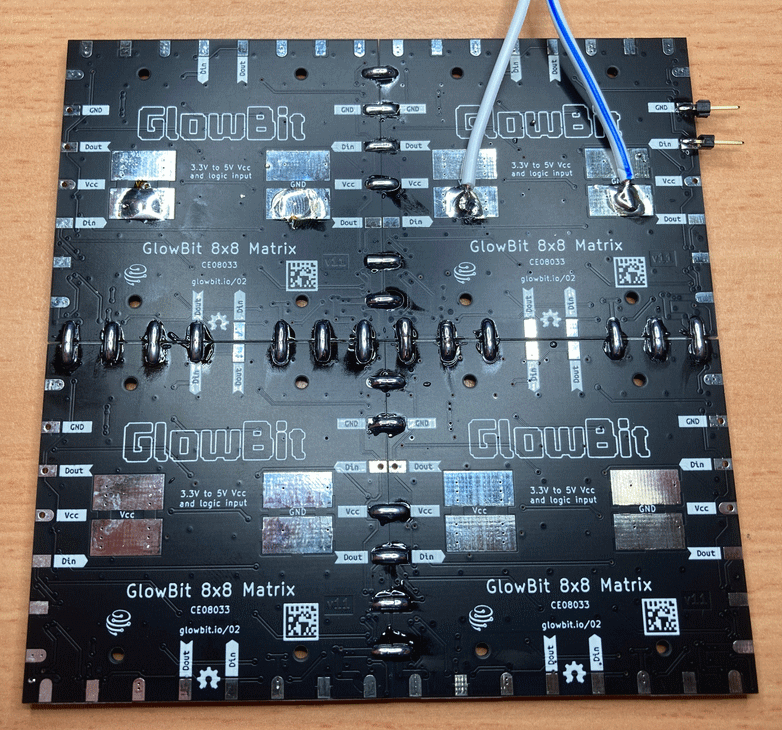
Connecting the Glowbit Matrix modules is well documented on the Core Electronics web site. The image below is taken from their website.
Originally I expected I was going to need another power supply for the Glowbit array, however the power from the Pico was more than sufficient to illuminate all the LEDs ins the array. This is 320 LEDs being controlled and powered from a $10 micro-controller board. I started testing the setup with a solderless bread-board as shown.
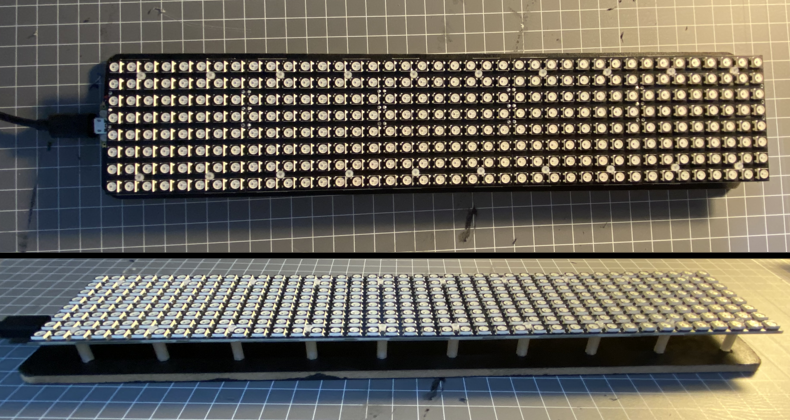
Then using some cheap offcut plyboard (that was packaging from something unrelated), I cut and drilled a board to mount the 5x1 Glowbit matrix array.
After soldering the 5 Glowbit Matrix modules to each other, I mounted them to the board. After testing the LEDs worked, I added the Raspberry Pi Pico W to the board under the LED modules and to one side. To achieve this I removed the modules from the board, soldered the wires to the Pico, and then mounted the Pico first, and then the modules back on the board.
The Software
There are two parts to the software project. The first is building the code to control the LEDs in the Glowbit matrix. The second part is the web app on the Pico W, so that it can be connected from another device to control the LEDs.
The LED Actions
In order to speed up the development of the code to control the LEDs I started by building a Glowbit emulator. This allows me to write and test code on my PC without having to upload to the Pico and test on the actual hardware each time.
You can find the code for the Glowbit Emulator here.
The image below shows the emulator running in a Debian Terminal through WSL2 on a Windows PC.
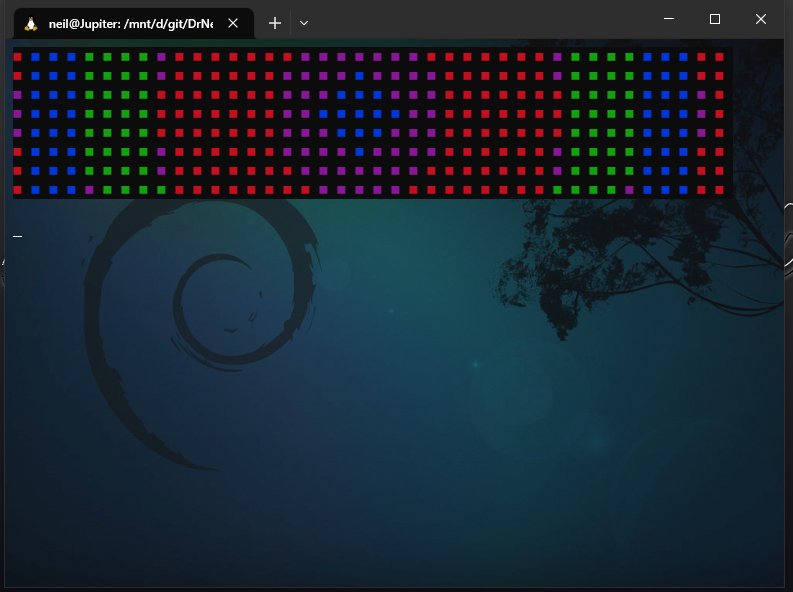
With the emulator python module I can then import the emulator on the PC and the actual Glowbit code on the target device.
try:
    import glowbitEmulator as glowbit
except:
    import glowbit
In an actions.py file I created an actions python class to encapsulate the different animations to play on the LEDs.
import _thread
import time

class actions():

    def __init__(self):
        self.matrix = glowbit.matrix8x8(1, 5)
        self.animate = False
        self.lock = _thread.allocate_lock()
This code initializes a glowbit matrix8x8 array of 1 row and 5 columns. If I wanted to use less or more of the glowbit modules, this is where I can change the shape and size of the modules.
The self.animate flag is used to indicate if an animation is running.
The self.lock allows for a thread to lock a resource while using it. This is used to wait for an animation to complete before starting a new animation in the LED array.
    def getLock(self):
        self.animate = False
        self.lock.acquire()
To start an animation the animate flag is set to false, this signals a running animation to stop, and release the lock. This lock can then be acquired by the new animation. For example in the
showText method.
    def showText(self, text, colour = 0xFF0000):
        self.getLock()
        self.matrix.blankDisplay()
        self.matrix.printTextWrap(text,0,0, colour)
        self.matrix.pixelsShow()
        self.lock.release()
In this
showText method the lock is acquired, then the matrix methods are used to display the text. Finally the lock is released.
The setColour method is similar.
    def setColour(self, colour):
        self.getLock()
        for i in range(self.matrix.numLEDs):
            self.matrix.pixelSet(i, colour)
        self.matrix.pixelsShow()
        self.lock.release()
The showText and setColour methods are fairly simple as they displays static content and then finish by releasing the lock.
The showScrollingText method will scroll text across the LEDs until the animate flag is set to false, by another method calling getLock.
    def showScrollingText(self, text, colour = 0xFF0000):
        self.animate = True
        self.matrix.blankDisplay()
        while self.animate:
            self.matrix.addTextScroll(text,0,0,colour)
            while self.animate and self.matrix.scrollingText:
                self.matrix.updateTextScroll()
                self.matrix.pixelsShow()
                time.sleep(0.2)
        self.lock.release()
The
showScrollingText method sets animate to True at the start to indicate it is now animating. Then the matrix is cleared with the blankDisplay() method.The
while loop will keep scrolling the text forever while the animate flag is True.
The cycle method also continues to animate while the animate flag is set to True. This cycle code is mostly taken from the Glowbit demo code, and modified to support the animate flag and lock.release() when finished.
    def cycle(self):
        self.animate = True
        self.matrix.blankDisplay()
        maxX = int(self.matrix.numLEDsX)
        maxY = int(self.matrix.numLEDsY)
        ar = self.matrix.ar
        pixelSetXY = self.matrix.pixelSetXY
        wheel = self.matrix.wheel
        show = self.matrix.pixelsShow
        while self.animate:
            for colourOffset in range(255):
                for x in range(maxX):
                    for y in range(maxY):
                        temp1 = (x-((maxX-1) // 2))
                        temp1 *= temp1
                        temp2 = (y-((maxY-1) // 2))
                        temp2 *= temp2
                        r2 = temp1 + temp2
                        # Square root estimate
                        r = 5
                        r = (r + r2//r) // 2
                        pixelSetXY(x,y,wheel((r*300)//maxX - colourOffset*10))
                show()
                if not self.animate:
                    break

            time.sleep(0.2)
        self.lock.release()
To define the actions that can be called on this actions class, the class exposes a list of actions.
def actionList(self):
        return ['off', 'red', 'green', 'blue', 'warning', 'cycle']
To call the different actions a callAction method determines which actions is requested and calls the correct method for that action.
def callAction(self, action, params):
        if action == 'off':
            self.getLock()
            self.matrix.blankDisplay()
            self.lock.release()
        elif action == 'red':
            self.setColour(0xFF0000)
        elif action == 'green':
            self.setColour(0x00FF00)
        elif action == 'blue':
            self.setColour(0x0000FF)
        elif action == 'warning':
            self.getLock()
            _thread.start_new_thread(self.showScrollingText, ('WARNING!!',))
        elif action == 'cycle':
            self.getLock()
            _thread.start_new_thread(self.cycle, ())
        elif action == 'text':
            if (len(params)>0):
                text = params[0][2:]
                print(text)
                colour = 0xFFFFFF
                if (len(params)>1):
                    colour = int(params[1][3:], 16)
                self.showText(text, colour)
        elif action == 'stext':
            self.getLock()
            if (len(params)>0):
                text = params[0]
                print(text)
                colour = 0xFFFFFF
                if (len(params)>1):
                    colour = int(params[1], 16)
                _thread.start_new_thread(self.showScrollingText, (text, colour,))
This callActions method uses the name of the action to determine which method to run. For the text and stext methods the params contain an array to determine the text and the colour of the text to display on the LEDs.
Note that the cycle and showScrollingText methods are started on another thread. The Raspberry Pi Pico supports two cores, and so this allows the animation to be displayed in a thread while the application can still receive commands to change the display.
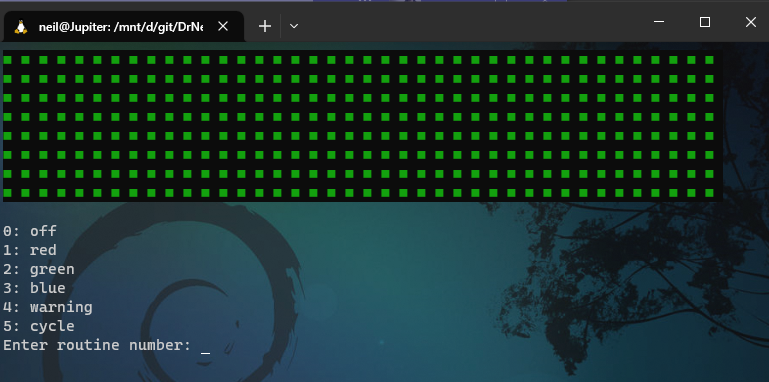
In order to test the actions class in the emulator, I wrote an actionRunner.py script in another file.
import actions

actions = actions.actions()
actionList = actions.actionList()

while True:
    actionNumber = 0
    for a in actionList:
        print(str(actionNumber) + ": " + a)
        actionNumber += 1

    routineNumber = input("Enter routine number: ")

    if routineNumber.isdigit() and int(routineNumber) < len(actionList):
        routine = actionList[int(routineNumber)]
        actions.callAction(routine, [])
    else:
        actions.callAction("text", ["t="+routineNumber])
Notice that if the number entered is not a digit that matches the action list, then the entered text is displayed on the LEDs.
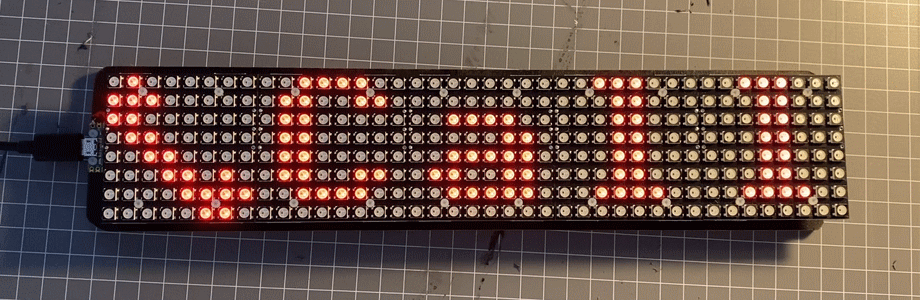
Running this in the emulator looks like this:
The Web App
To call the actions through a web page, or a REST service, requires that the actionRunner script shown in the previous step is written as a web application.
Building a web app in micro-python is well documented, however for completeness I will outline the code here.
To display a web page with the actions requires an HTML response is created. This is done in a webPage method.
def webpage(value):
    html = f"""
            <!DOCTYPE html>
            <html>
            <body>
            <H1>Glowbit Server</H1>
            <h2>Select an action</h2>"""

    for a in actions.actionList():
        html += """
        <a href="/"""+a+"""">"""+a+"""</a><br>
        """

    html += """
        <form action="./text">
        <label>Text:</label><br>
        <input type="text" name="t" value="Hello"><br>
        <label>Color:</label><br>
        <input type="color" name="c" value="#00ff00"><br>
        <input type="submit" value="Submit">
        </form>
        """

    html += """
            <p>Request is """+value+""" </p>
            </body>
            </html>
            """
    return html
This lists the actions retrieved from the
actionsList defined in the actions.py class discussed previously.
To serve this page on a connection a serve method is needed.
def serve(connection):
    while True:
        client = connection.accept()[0]
        request = client.recv(1024)
        request = str(request)
        try:
            request = request.split()[1]
        except IndexError:
            pass

        print(request)
        parts = request.lstrip('/\\').split('?')
        args = list()
        if (len(parts)>1):
            args = urlParse(parts[1]).split('&')
        action = parts[0]
        print(action)

        actions.callAction(action, args)

        value=action
        html=webpage(value)
        client.send(html)
        client.close()
This method uses a connection to parse the request and call an action in the actions class created earlier. Then the html for the web page is sent to the client.
The actions.callAction(action, args) is the place this code enables a web page to control the output on the LEDs.
The urlParse method converts any text with spaces, or special characters' into the text to display on the LEDs.
def urlParse(url):
    l = len(url)
    data = bytearray()
    i = 0
    while i < l:
        if url[i] != '%':
            d = ord(url[i])
            i += 1
        else:
            d = int(url[i+1:i+3], 16)
            i += 3
        data.append(d)
    return data.decode('utf8')
To create the connection that is used in the serve method a socket is opened on port 80 on the micro controller device, in this case the Pico W.
def openSocket(ip):
    address = (ip, 80)
    connection = socket.socket()
    connection.bind(address)
    connection.listen(1)
    print(connection)
    return(connection)
This openSocket method uses the provided ip address to the create and return a connection. The same connection used to serve the webPage.
Putting all of this together in a main 'run` method, looks like this.
def run():
    actions.showText('boot.', 0xFF0000)

    wlan = network.WLAN(network.STA_IF)
    wlan.active(True)
    wlan.connect(creds.ssid, creds.pwd)

    # Wait for connect or fail
    wait = 10
    while wait > 0:
        if wlan.status() < 0 or wlan.status() >= 3:
            break
        wait -= 1
        print('waiting for connection...')
        time.sleep(1)

    # Handle connection error
    if wlan.status() != 3:
        actions.showText('fail', 0xFF0000)
        raise RuntimeError('wifi connection failed')
    else:
        print('connected')
        ip=wlan.ifconfig()[0]
        print('IP: ', ip)
        actions.showText(ip[-4:], 0x00FF00)
        time.sleep(1)

    try:
        if ip is not None:
            connection=openSocket(ip)
            serve(connection)
    except KeyboardInterrupt:
        machine.reset()
This run method starts by using the actions.showText method to display boot. on the screen in red. This notifies the person running the app that the device is booting, or starting up.
To connect to the WIFI requires the SSID and the password for that network. Obviously you want to keep this secret and so it should live in a file that is not part of the main code. Ideally this would be set as an environment variable, or a certificate installed on the micro controller device. However for this example, to keep it simple, I used a creds.py file like this
ssid = "MySSID"
pwd = "ssid_passcode"
NOTE this is not secure and should not be considered best practice
The run method waits for the connection to the WIFI network to complete. If it fails then the actions.showText method is used to notify of the connection 'fail'.
If the connection to the WIFI network succeeds then the last 4 digits of the IP address are displayed on the LED array, in green. This should help with finding the page to connect to the device.
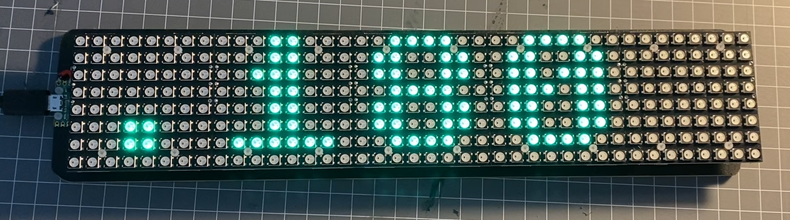
Once the connection is made, the socket is opened with openSocket, and then the device can serve the connection.
To start this web app and the actions the code is then simple
actions = actions.actions()
run()
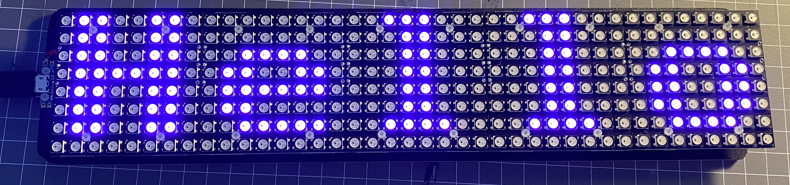
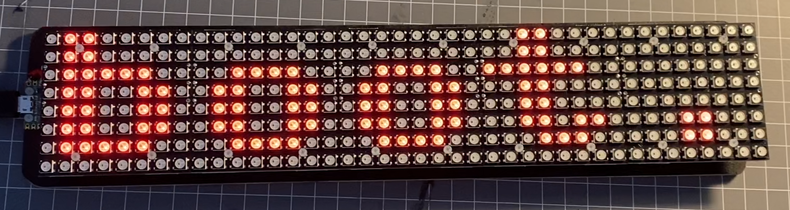
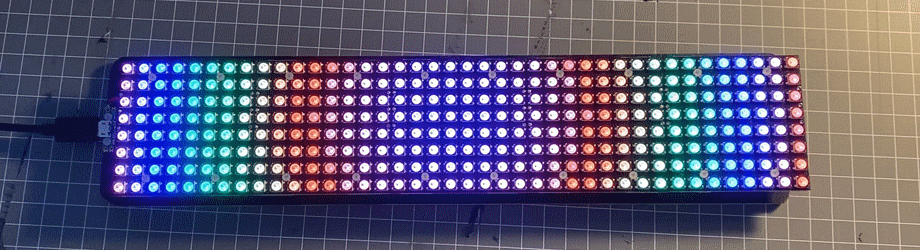
Here is the final result running the colour cycle.
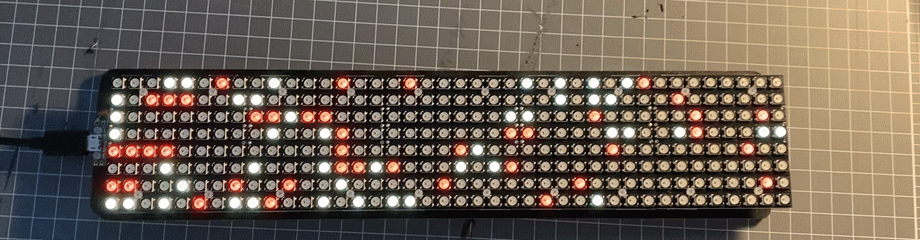
Once this is working you can extend out the actions to display a variety of animations, here the Glowbit server is running Conway's Game of Life
With the Glowbit server controlled via a web URL you can hook it up to other software. Here is displaying that I am in a call, which is determined from my status in Microsoft Teams.